The RV water system is one of the most important systems on your rig, yet it’s also one of the most misunderstood. From campground hookups to onboard fresh water tanks, every part of the system works together to deliver clean, safe water for drinking, cooking, cleaning, and bathing.
When used correctly, the RV water system is simple and reliable. When used incorrectly, it can lead to leaks, low pressure, bad-tasting water, or damage to plumbing components.
The RV water system also plays a critical role in operating the sewer system. Proper water flow is what allows waste to move through the black and gray tanks correctly, helping prevent clogs, odors, and buildup.
Understanding how the RV water system works, what gear is essential, and how to protect it at the campsite helps ensure safe water access and fewer problems, no matter where or how you travel.
How an RV Water System Works (Big Picture Overview)
An RV water system is designed to deliver clean, pressurized water to your sinks, shower, toilet, and water heater whether you are connected to a campground hookup or parked miles away from the nearest utility line. While the system may look complicated from the outside, it operates on a simple principle: water must enter the RV, become pressurized, and then be distributed through cold and hot plumbing lines.
Every RV water system has three core components: a water source, a method of creating or controlling pressure, and a distribution network that routes water to fixtures and the water heater.
The water source can come from one of two places. When connected to a campground spigot, your RV receives water from an external pressurized supply known as city water. When not connected to a spigot, your RV relies on its onboard fresh water tank. That tank stores potable water and supplies it to the plumbing system during dry camping or travel.
Pressure is what allows water to move through the system. When using city water, pressure is provided by the campground’s plumbing system. When operating from the fresh tank, a 12-volt demand pump creates pressure inside the RV’s plumbing lines. Although the plumbing layout remains the same in both modes, the source of pressure changes depending on how you are set up.
Once water enters the RV and becomes pressurized, it flows into the cold-water distribution line. From there, it splits. One branch supplies cold water directly to fixtures such as sinks and toilets. The other branch feeds the water heater. After water is heated, it travels through the hot-water line to your faucets and shower.
Most modern RVs use flexible PEX tubing for plumbing, along with check valves to prevent backflow between systems. The water heater itself does not create pressure; it simply heats water that is already under pressure from either the campground supply or the onboard pump.
At its core, the RV water system is a closed pressurized loop. The only difference between hookup mode and tank mode is where the pressure originates. Once you understand that concept, diagnosing problems and protecting your plumbing becomes much simpler.
In the next section, we’ll look specifically at what happens when you connect to city water and why pressure control is one of the most important steps in protecting your RV.
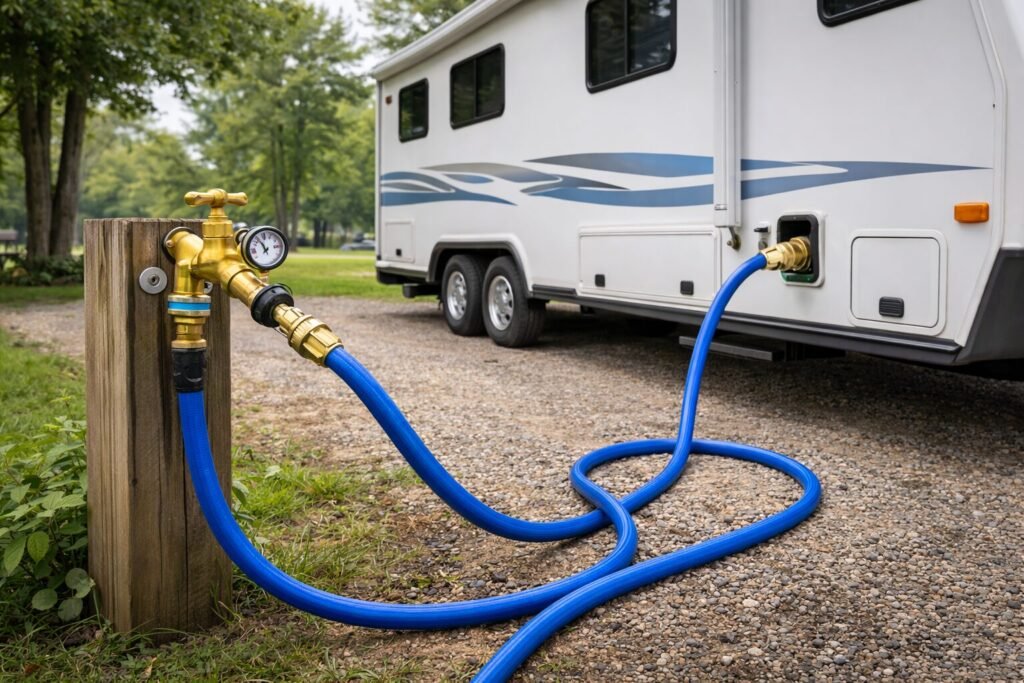
City Water Hookup: How It Actually Flows Through the RV
When you connect your RV to a campground water spigot, you are tying directly into an already pressurized plumbing system. Unlike tank mode, where your RV must create its own pressure, city water arrives at your coach under pressure before it ever enters your plumbing. Understanding exactly how that water moves through the system will help you protect your RV and troubleshoot problems with confidence.
The process begins at the campground spigot. Municipal and park water systems can vary widely in pressure. Some operate at a safe 40–50 PSI, while others can exceed 80 PSI. RV plumbing systems are not built to handle excessive pressure long term. That is why a water pressure regulator should always be installed at the spigot before water travels through your hose. The regulator reduces incoming pressure to a safe operating range, typically between 40 and 55 PSI, protecting fittings, seals, and PEX connections throughout the coach.
From the spigot, water flows through your potable water hose and into the RV’s city water inlet. Behind that inlet is typically a small screen designed to catch debris and a one-way check valve that prevents backflow. That check valve ensures water does not flow backward out of the system or unintentionally fill the fresh tank while you are connected to city supply.
Once water passes through the inlet, it enters the main cold-water distribution line inside the RV. At this point, the entire plumbing system becomes pressurized. Your onboard 12-volt pump should remain off while connected to city water because the external supply is doing all the work. If the pump is running while hooked up, something is not functioning correctly, usually a faulty check valve.
From the cold-water distribution line, the flow splits. One branch feeds cold water directly to sinks, showers, and the toilet. Another branch directs water into the water heater. Cold water enters the bottom of the heater tank. As it is heated—by propane, electric element, or both—it rises to the top of the tank. When you open a hot faucet, pressurized cold water entering the heater pushes hot water out through the hot-water outlet line and into your fixture.
It is important to understand that the water heater does not create pressure. It only heats water. The pressure throughout the system is entirely dependent on the campground supply while in city water mode. Because the system remains constantly pressurized, every fitting and connection inside the RV is under stress as long as you are hooked up. That is why leaks sometimes appear while connected to city water but not when running from the fresh tank.
When everything is functioning correctly, city water provides steady, consistent flow and effectively unlimited supply. If pressure fluctuates or drops while connected, the cause is usually external—a weak campground source, a clogged regulator, sediment in the inlet screen, or restriction in the hose—rather than a failure within the RV itself.
Understanding this flow path—from spigot to regulator, through the hose, past the inlet check valve, into the cold distribution line, through the water heater, and finally to your fixtures—gives you control over the system instead of guessing at it. Once you understand where pressure originates and how it travels, diagnosing issues becomes logical instead of stressful.
Understanding RV Water Pressure (Why PSI Matters More Than You Think)
Water pressure is the single most important factor in protecting your RV plumbing system. Too little pressure results in weak showers and inconsistent water heater performance. Too much pressure can damage fittings, loosen connections, and cause hidden leaks behind walls.
RV plumbing systems are generally designed to operate safely between 40 and 55 PSI. This range provides comfortable water flow while protecting PEX tubing, seals, and appliance connections.
When connected to city water, pressure is determined by the campground supply. Some parks operate within a safe range, but others can exceed 70 or even 80 PSI. Excessive pressure does not usually cause immediate failure. Instead, it stresses fittings gradually, which is why leaks often appear unexpectedly after several days of connection.
In fresh tank mode, the 12-volt pump regulates system pressure automatically. Most RV pumps are factory-set within the safe operating range. However, low battery voltage can reduce pump output, resulting in weak pressure at fixtures.
Pressure behavior also affects water heaters, especially tankless systems. Tankless heaters require a minimum flow rate to activate. If pressure drops too low, the heater may cycle off or produce fluctuating temperatures.
Fluctuating pressure while on city water usually indicates one of three causes: inconsistent campground supply, a clogged regulator, or a partially restricted hose. Fluctuating pressure in tank mode usually traces back to the pump or a small leak within the system.
Understanding PSI is not about overcomplicating the system. It is about recognizing that your RV plumbing is built for controlled pressure, not raw campground supply. When pressure is managed correctly, most water system problems are prevented before they start.
If you’re unsure which connection gear you should have before your first trip, our First-Time RV Starter Essentials guide walks through everything you’ll need.
RV Water Filters: Do You Really Need One?
Campground water is not always the same. Some parks are connected to municipal systems. Others rely on wells. Mineral content, sediment levels, and chlorine treatment can vary significantly from one location to another. Even when the water is technically safe, it may contain particles or chemical taste that affect both comfort and long-term system performance.
An RV water filter adds a layer of protection between the campground spigot and your plumbing system.
When installed at the water source, a filter reduces sediment before it enters your pipes, water heater, and fixtures. Fine sand and mineral particles may seem harmless, but over time they can accumulate in faucet aerators, clog pump strainers, and settle inside the water heater tank. Sediment buildup is one of the leading causes of premature water heater wear.
Beyond protecting plumbing components, filters also improve taste and odor. Many campground systems use higher chlorine levels than residential supplies. A quality carbon-based filter reduces chlorine taste and improves overall water quality for drinking and cooking.
There are two primary types of RV water filtration systems.
Inline filters are the simplest and most common option. These attach directly to the spigot or between the hose and the RV inlet. They are inexpensive, easy to replace, and effective for basic sediment and taste control. For most recreational campers, an inline carbon filter provides sufficient protection.
Canister-style filtration systems offer a higher level of filtration. These systems use replaceable cartridges and can filter finer particles. Some models allow you to choose specific filtration types, such as sediment-only or advanced carbon filtration. Canister systems are often preferred by full-time RVers or those traveling to areas with inconsistent water quality.
Regardless of the type chosen, filters must be replaced regularly. Most inline filters are rated for one camping season or a specific gallon capacity. Allowing a filter to clog reduces water pressure and can strain the system.
It is important to understand that standard RV water filters improve taste and remove sediment, but they do not make unsafe water potable in extreme contamination situations. They are designed for typical campground water conditions, not untreated surface water.
Installing a water filter is not about paranoia. It is about protecting your plumbing system and improving everyday comfort.
A properly filtered supply reduces sediment in your water heater, protects valves and seals, and ensures cleaner water inside your RV.
Fresh Water Tank and 12-Volt Pump: How Your RV Creates Its Own Pressure
When you are not connected to a campground water supply, your RV becomes a self-contained system. There is no external pressure feeding the plumbing. Instead, your RV relies entirely on its onboard fresh water tank and 12-volt demand pump to create water flow.
The fresh water tank is typically mounted low in the RV frame to maintain stability and proper weight distribution. It stores potable water that you fill either through a gravity fill port or a designated tank-fill valve at the utility panel. Once filled, the water inside the tank is not pressurized. It simply sits there until the pump activates.
The 12-volt water pump is the heart of tank mode. Most RVs use a diaphragm-style demand pump designed to automatically maintain system pressure. When you turn the pump on, it pressurizes the cold-water plumbing lines to a preset range, usually between 40 and 55 PSI. The pump does not run continuously. It operates only when pressure drops.
When you open a faucet, flush the toilet, or turn on the shower, pressure inside the plumbing lines decreases. The pump senses that drop and immediately activates, pulling water from the bottom of the fresh tank and pushing it into the system. When the faucet is closed and pressure stabilizes again, the pump shuts off automatically.
From that point forward, water flows through the same plumbing layout used in city water mode. Cold water travels directly to fixtures and into the water heater. Heated water then exits through the hot-water lines to your faucets and shower. The only difference between city mode and tank mode is where the pressure originates.
Because the pump depends on 12-volt battery power, battery condition directly affects water performance. Weak batteries can cause low pressure or inconsistent flow. Likewise, if the pump cycles repeatedly when no fixture is open, that usually indicates a slow leak, a dripping toilet valve, or a failing internal check valve in the pump itself.
Unlike city water hookup, your water supply in tank mode is limited to the tank’s capacity. A 40-gallon tank means 40 gallons total until refilled. Managing water use becomes important during dry camping, especially for showers and dishwashing.
Understanding how the fresh water tank and pump work gives you control over the system. It allows you to diagnose cycling noises, pressure drops, and flow problems without guessing. Once you recognize that the pump is simply maintaining pressure inside a closed plumbing loop, the system becomes logical rather than mysterious.
The Two Types of RV Water Heaters
While the flow of water through the system remains the same, RVs typically use one of two types of water heaters. Understanding which one you have matters for operation, troubleshooting, and maintenance.
The first and most common type is the traditional tank-style water heater. These are usually six or ten gallons in capacity. Cold water enters the bottom of the tank, where it is heated either by propane, an electric heating element, or both. As the water heats, it rises to the top of the tank. When you open a hot faucet, incoming pressurized cold water pushes the stored hot water out through the hot water line and to your fixture.
Tank-style heaters are simple, reliable, and common in travel trailers, fifth wheels, and motorhomes. However, they are limited by capacity. Once the hot water inside the tank is depleted, you must wait for the tank to reheat before having full hot water again.
The second type is a tankless, or on-demand, water heater. Instead of storing hot water, tankless systems heat water only when a faucet is opened. Cold water flows through a heat exchanger and is instantly heated by propane as it passes through the unit. Because there is no storage tank, tankless systems can theoretically provide continuous hot water as long as propane and water flow are maintained.
Tankless heaters are becoming more common in newer RVs, especially in higher-end or four-season models. They eliminate the recovery wait time associated with tank systems, but they require proper water pressure and flow rate to function correctly. Inconsistent pressure can cause temperature fluctuations.
In both systems, the water heater does not generate pressure. It simply heats water that is already under pressure, whether that pressure comes from campground supply or your onboard pump.
Knowing which type of water heater your RV has will help you understand its performance limits and prevent confusion when hot water behavior changes.
Essential RV Water System Gear (What You Actually Need and Why)
Understanding how your RV water system works is only part of the equation. Protecting that system is what prevents costly repairs and frustrating campground problems.
RV plumbing is durable, but it is not designed to handle extreme pressure, contaminated water, or freezing temperatures without the right equipment. The difference between a trouble-free trip and a flooded cabinet often comes down to a few simple pieces of gear.
The first and most important item is a potable water hose. RV drinking water hoses are manufactured with materials safe for potable use and are typically reinforced to handle consistent pressure. A standard garden hose is not rated for drinking water and can introduce unwanted taste, odor, and potential contaminants into your fresh water system. Using a proper RV-rated hose ensures safe water and better durability.

Professional Plus Drinking Water Hose: Camco's EvoFlex Professional Plus RV fresh water hose is lead, BPA, & phthalate-free. This quality PVC hose prioritizes your health with every use.
A water pressure regulator is critical whenever you connect to city water. Campground water pressure can vary widely, and many systems exceed safe limits for RV plumbing. A quality regulator reduces incoming pressure to a controlled range, typically between 40 and 55 PSI. Adjustable regulators with built-in gauges provide even greater control and allow you to monitor actual incoming pressure at each campsite.
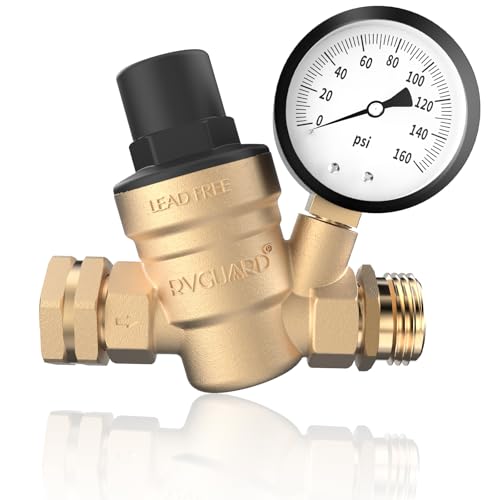
Prevent water pipes from being damaged due to high pressure
An inline water filter is another important layer of protection. Campground water can contain sediment, minerals, and chlorine levels that affect taste and appliance longevity. A filter installed between the spigot and the RV inlet reduces sediment buildup in faucets, protects water heater components, and improves water quality inside the coach.

Advanced 6-Step Filtration Technology
A 90-degree hose elbow at the city water inlet is a small addition that prevents unnecessary strain on the connection point. Because the city water port is mounted flush against the RV wall, a straight hose connection can put downward pressure on the fitting. Over time, this stress can loosen connections behind the wall. An elbow allows the hose to hang naturally and protects the inlet.

SWIVELING EASY-GRIP CONNECTOR:
For cold-weather camping, a heated water hose becomes essential. When temperatures drop below freezing, exposed hoses can freeze solid, cutting off water supply and potentially damaging plumbing. Heated hoses are insulated and electrically warmed to prevent freezing during winter conditions.

Our heated water hose for rv through the intelligent heating control system in order to keep the water flow will not freeze in the hose, even when the temperature outside drops to -45°F. It's a well-known fact that in most areas during winter nights, regular hoses freeze due to low temperatures.
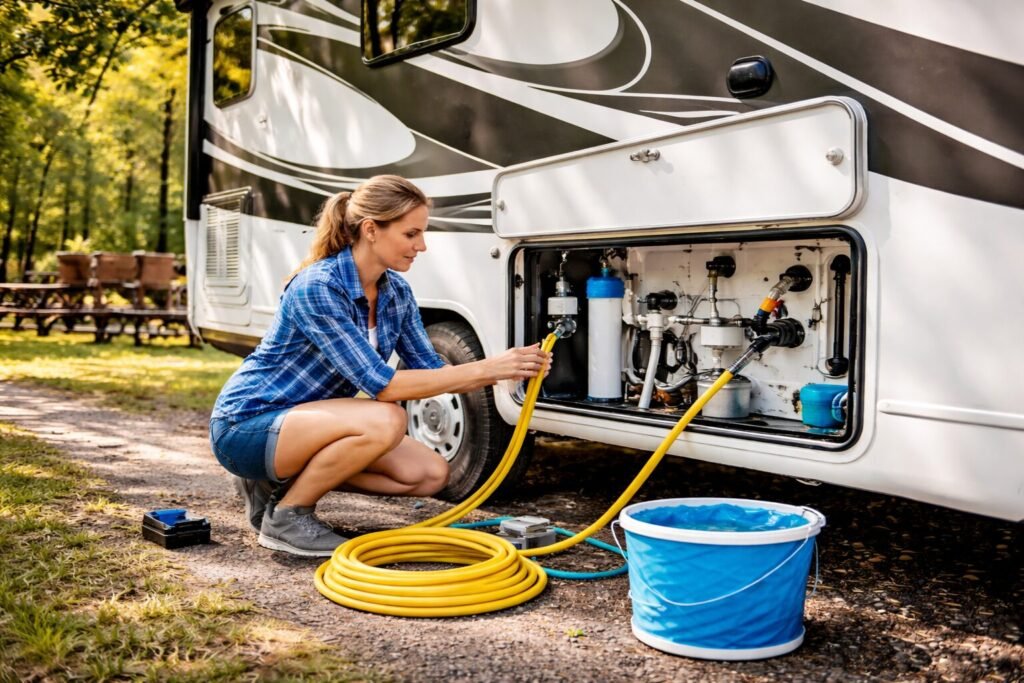
Inside the RV, water heater maintenance tools are equally important. Tank-style heaters require periodic flushing to remove sediment buildup. If the heater uses a sacrificial anode rod, it must be inspected and replaced as needed to protect the tank from corrosion. Neglecting this maintenance can shorten the life of the heater significantly.

This RV anode rod for hot water heater is designed to protect and extend the life of your equipment
Each of these components serves a protective purpose. They are not optional upgrades. They are preventative tools that extend the life of your RV water system and reduce the likelihood of expensive repairs.
When your water system is properly equipped and protected, it becomes one of the most reliable systems in your RV.
Common RV Water System Problems and How to Diagnose Them
Even when properly maintained, RV water systems can develop issues. The key to diagnosing problems is understanding where pressure originates and how water flows through the system. Once you understand that, most problems become logical rather than mysterious.
One of the most common complaints is low water pressure. If you are connected to city water and pressure is weak, the first place to look is the regulator. Fixed regulators can restrict flow more than expected, especially if campground pressure is already low. Sediment buildup in the inlet screen or a partially kinked hose can also reduce flow. In city mode, low pressure is often external rather than an internal plumbing failure.
If low pressure occurs while running from the fresh tank, the cause is usually different. Weak battery voltage can reduce pump performance. A clogged pump strainer, air in the lines, or a partially blocked pickup tube inside the tank can also restrict flow. Because the pump creates pressure in tank mode, anything affecting pump performance will affect water pressure.
Another frequent issue is the water pump cycling when no faucet is open. When the system is pressurized and no fixture is being used, the pump should remain off. If it turns on briefly every few minutes, pressure is escaping somewhere. This often indicates a small leak, a dripping toilet valve, a loose fitting under a sink, or a failing internal check valve inside the pump. Even a slow pressure drop will trigger the pump to re-pressurize the system.
No hot water is another common frustration. If you have cold water but no hot water, the first check is whether the water heater is actually turned on and fueled correctly. On propane models, confirm that propane is flowing and the burner is igniting. On electric mode, verify that the heating element breaker is not tripped. If using a tankless heater, insufficient water flow can prevent ignition. In tank-style heaters, sediment buildup can reduce heating efficiency over time.
Fluctuating water temperature is often seen in tankless systems. These heaters rely on consistent pressure and flow rate. If pressure drops or flow varies, temperature can swing unexpectedly. Inconsistent campground pressure or a restrictive regulator can contribute to this behavior.
Water hammer, which sounds like a banging noise in the pipes, occurs when water flow is stopped abruptly. This is more noticeable in city water mode because the system is constantly pressurized. While occasional minor noise is not uncommon, excessive hammering may indicate high pressure or a need for pressure stabilization.
Leaks are the most serious issue and should be addressed immediately. Because RV plumbing uses flexible PEX tubing and crimp fittings, most leaks occur at connection points rather than along straight runs of pipe. Inspect under sinks, near the water heater, and around the pump first. When connected to city water, remember that the system remains under constant pressure, which can worsen even small leaks.
The important thing to remember is this: water systems behave differently depending on the source of pressure. City water problems often originate outside the RV. Tank-mode problems usually trace back to the pump or battery.
Understanding that distinction simplifies troubleshooting and prevents unnecessary repairs.
Seasonal Maintenance and Winter Protection
An RV water system will last for years if it is maintained properly. Neglect, freezing temperatures, and high pressure are the three biggest causes of plumbing damage. The good news is that most failures are preventable with routine inspection and seasonal preparation.
Throughout the camping season, regular visual checks make a significant difference. Inspect all accessible fittings under sinks and around the water heater for signs of moisture. Even a small drip can lead to cabinet damage if ignored. Check hose washers at the city water connection and replace them if they show cracking or flattening. Examine the water pump strainer for debris buildup and clean it as needed to maintain proper flow.
Your water heater also requires routine attention. Tank-style heaters should be flushed at least once per season to remove sediment accumulation. If your system uses a sacrificial anode rod, inspect it annually and replace it when it is significantly deteriorated. The anode rod protects the steel tank from corrosion. Ignoring it can shorten the life of the heater dramatically. Tankless systems do not use an anode rod but should still be inspected for debris and proper burner operation.
Water pressure control is another part of seasonal maintenance. Regulators should be checked for consistent output, especially if using an adjustable model. Excessive pressure can slowly stress fittings and seals over time, even if no immediate leak is visible.
As temperatures begin to drop, winter protection becomes critical. Water expands when it freezes. Even a small amount of trapped water inside a fitting, pump housing, or line can crack components and cause leaks that may not become visible until spring.
Before freezing weather arrives, the entire system must be properly winterized. This includes draining the fresh water tank, opening low-point drains, and completely draining the water heater. The heater should always be placed in bypass mode before introducing RV antifreeze into the plumbing lines. Pumping RV-specific antifreeze through the system ensures that all lines, fixtures, and valves are protected from freeze damage.
If you plan to camp in cold weather, protection shifts from draining to prevention. Heated water hoses help prevent freezing between the spigot and the RV. Inside the coach, enclosed and heated underbellies offer some protection, but extreme temperatures can still pose risk. Monitoring overnight lows and insulating exposed connections is essential during winter camping.
Freezing damage is one of the most expensive plumbing repairs an RV owner can face. Cracked fittings, split lines, and damaged pumps are almost always preventable with proper preparation.
If you’re planning to camp in colder temperatures, read our complete winter RV camping guide before heading out.
Routine maintenance during the season and careful winter protection during storage are what separate trouble-free RV ownership from costly surprises.
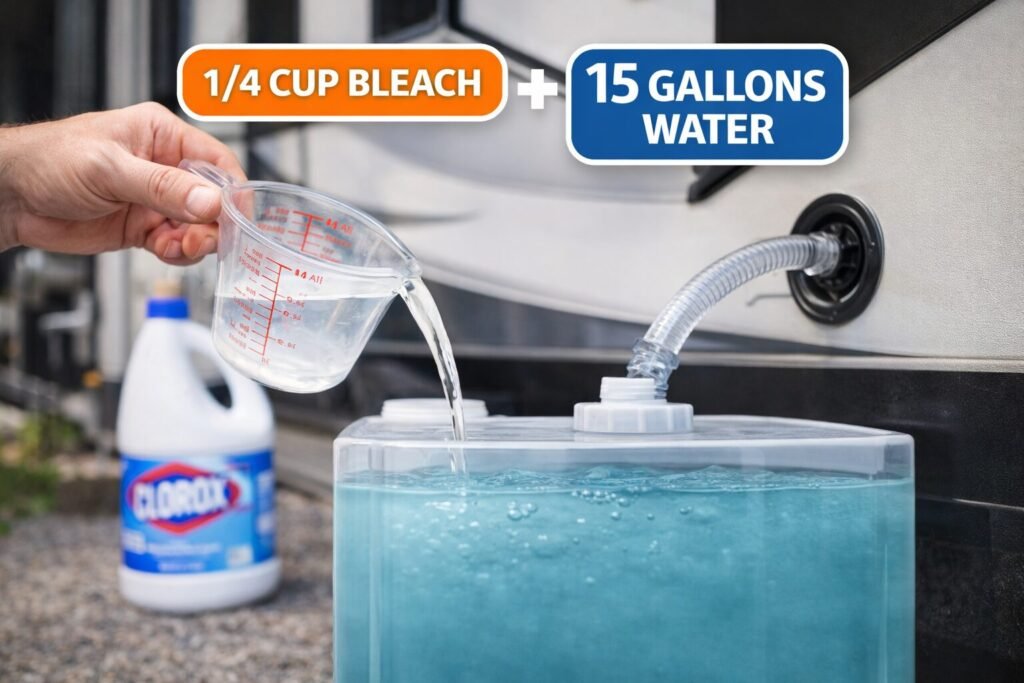
How to Sanitize Your RV Fresh Water Tank (Step-by-Step)
Even if campground water is safe at the source, your fresh water tank is still a storage container. Over time, stagnant water, temperature changes, and mineral residue can allow bacteria and odor to develop inside the tank and plumbing lines. Regular sanitizing keeps your water system clean and safe for drinking, cooking, and bathing.
Most manufacturers recommend sanitizing the fresh water system at least once per season, and always after long-term storage.
The standard method uses unscented household bleach. The commonly accepted ratio is one-quarter cup of plain bleach for every fifteen gallons of fresh water tank capacity. It is important to use regular, unscented bleach with no additives.
The process begins by fully draining the fresh water tank. Open the low-point drains and allow the system to empty completely. If your water heater is not in bypass mode, it should also be drained separately before beginning the sanitation process.
Next, mix the appropriate amount of bleach with water in a clean container. Never pour concentrated bleach directly into the tank without dilution. Once mixed, pour the solution into the fresh water tank through the gravity fill port or use the tank fill valve if your RV is equipped with one.
After adding the solution, fill the tank completely with fresh water. Turn on the water pump and open each faucet individually, both hot and cold, until you smell bleach at every fixture. This step ensures the sanitizing solution travels through the entire plumbing system, including the water heater (unless bypassed).
Once the system is fully charged with the bleach solution, let it sit. Most guidelines recommend allowing the solution to remain in the system for at least four hours. For deeper sanitation, many RV owners allow it to sit overnight.
After the waiting period, drain the entire system again. Refill the fresh water tank with clean water and flush all fixtures until the bleach smell disappears. In some cases, a second rinse may be needed.
It is important not to leave bleach in the system longer than necessary. Extended exposure can degrade rubber seals and fittings over time.
When completed properly, sanitizing removes odor, reduces bacteria buildup, and protects the long-term integrity of your water system.
Clean water is not just about comfort. It is about protecting your health and preserving your RV’s plumbing.
Final Water System Check Before Your Next Trip
Before every trip, take a few minutes to confirm your RV water system is ready. Most plumbing problems are preventable with simple checks done ahead of time rather than at a campsite.
If you will be connecting to city water, inspect your drinking water hose for cracks or worn fittings. Confirm that your pressure regulator is functioning properly and installed at the spigot before water enters your hose. Make sure washers are seated correctly in each connection to prevent drips under pressure.
If you are traveling or dry camping, verify that your fresh water tank is clean and properly filled. Turn on the pump and confirm it pressurizes the system without constant cycling. A pump that runs briefly and shuts off is normal. A pump that cycles repeatedly with no fixtures open usually indicates a small leak or pressure loss that should be addressed before departure.
Check your water heater operation in advance. Confirm propane ignition or electric heating function and ensure the tank is filled with water before activating a tank-style heater. Never operate a tank heater dry, as this can damage the heating element.
Inspect under sinks and around the water heater for any signs of moisture. Even a minor drip can become a larger issue once the system is under full pressure at a campground.
If temperatures are expected to drop near freezing, confirm that hoses and exposed fittings are protected. In freezing conditions, prevention is far easier than repair. If storing the RV for winter, verify that the system has been properly drained and winterized.
Finally, remember the core principle of your RV water system: control the pressure, protect the plumbing, and maintain the components. Whether you are using city water or the fresh tank, understanding where pressure originates and how it moves through the system allows you to troubleshoot calmly and confidently.
When your water system is maintained and protected, it becomes one of the most dependable systems in your RV.
If you’re new to RV systems, it’s just as important to understand how waste leaves your RV. Our complete guide to how an RV sewer system works breaks it down step by step.