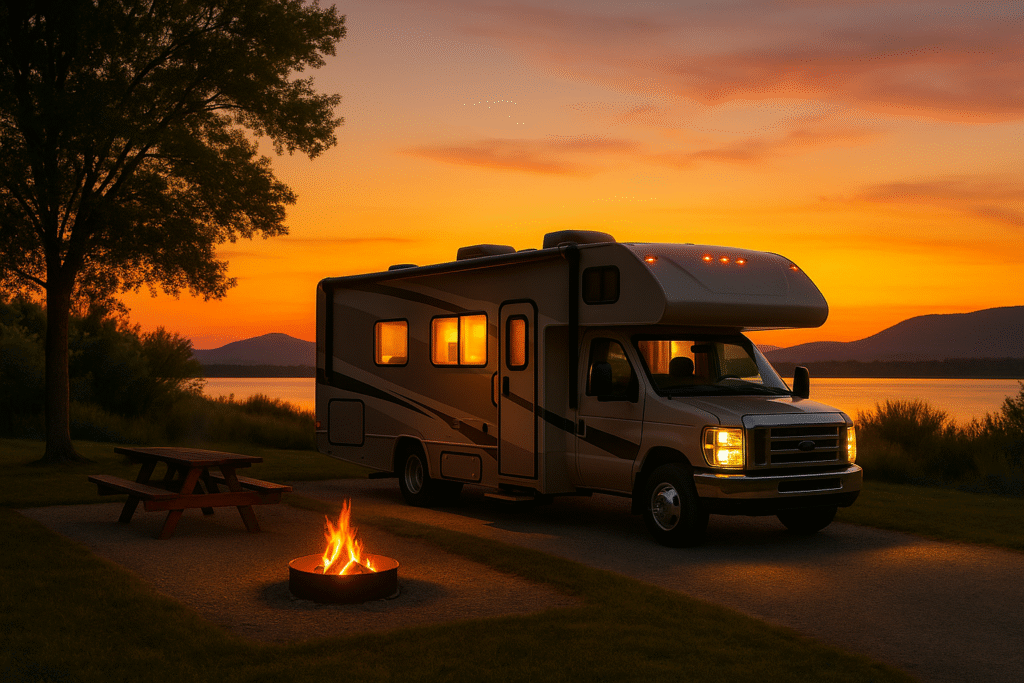
Finding the right RV campsite fit is the key to stress-free travel. It’s not just about pretty views—it’s about making sure your rig actually fits the site. In this guide, you’ll learn how to measure your RV, match those numbers to campsite dimensions, and book the perfect spot without surprises.
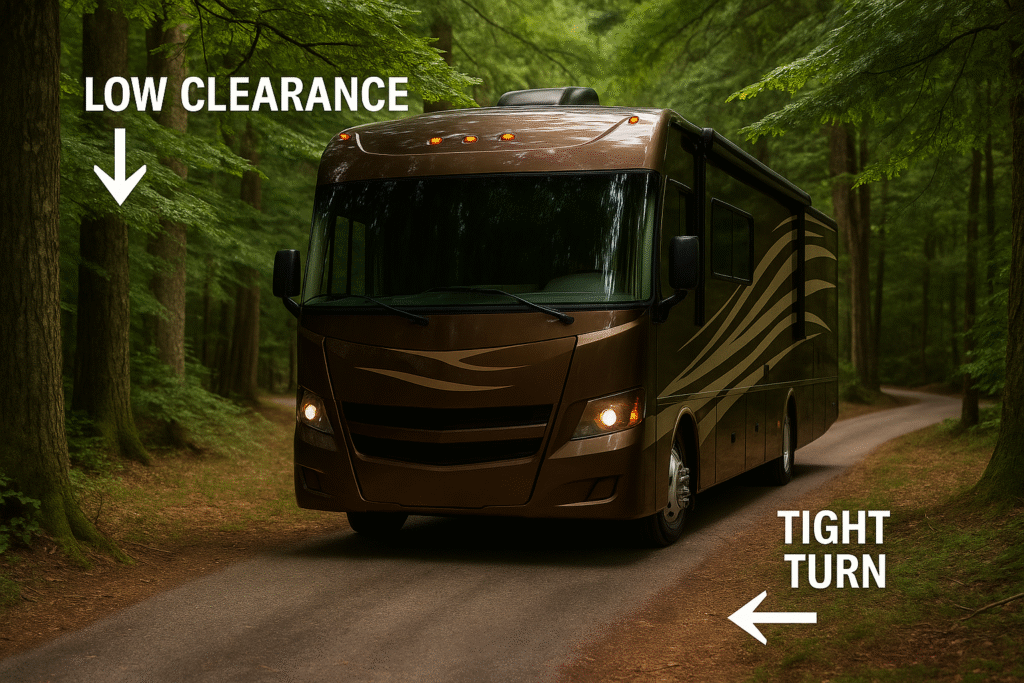
When I first hit the road in my 31-foot Travel Trailer, I made every rookie mistake—low branches, tight turns, and a pad that barely fit my tires. It was a stressful lesson, but it taught me how critical it is to know your RV’s true size and the details that make or break a good site. Now, I want to help you avoid that same frustration. This will help you find a campsite that fits your RV.
In this step-by-step RV campsite size guide, you’ll learn how to measure your RV’s real dimensions, understand campsite types, and use simple tools to confirm your rig will fit before you click “Reserve.”
Table of Contents
Know Your RV’s True Dimensions Before You Book
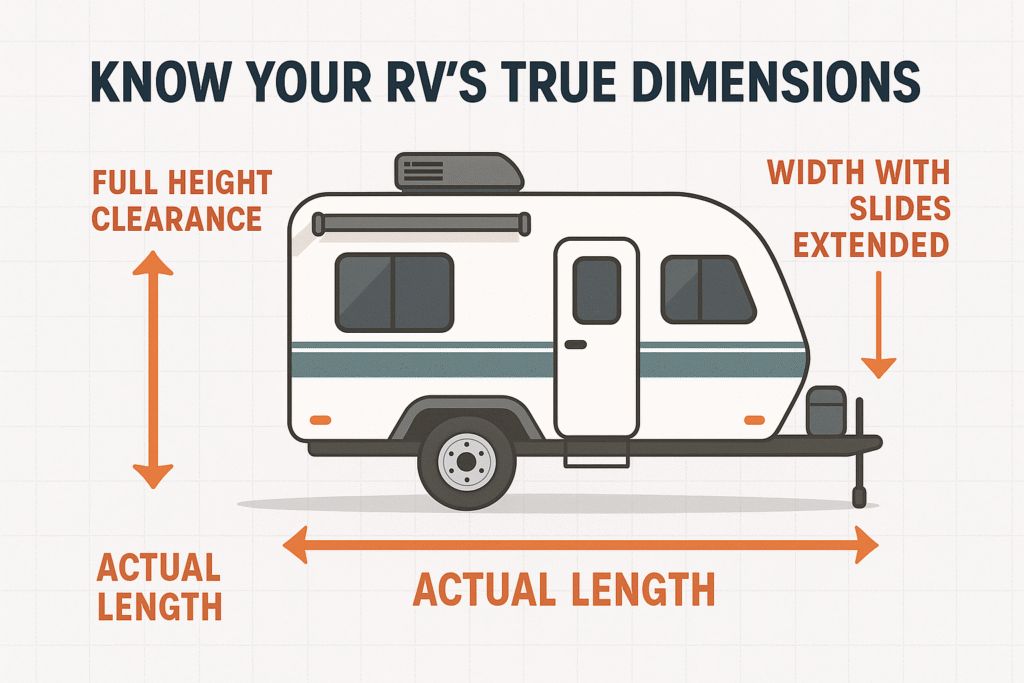
Before you can match your RV to the right campsite, you need to know the real measurements you’re working with—not the marketing numbers, not the brochure estimates, and not the “close enough” guesses a lot of owners go by at first. Your RV’s true length, width, and height will determine which sites you can safely book, how you maneuver through the campground, and whether your setup actually fits once you arrive. Accurate measurements eliminate surprises and give you complete confidence when planning your trip.
Measure Your RV’s Actual Length and Width
The number printed on your RV’s brochure or door sticker usually refers to the floorplan length, not the true exterior length of the rig. It’s almost always shorter than what you’ll actually be working with. You need to measure from the very front—hitch, tow bar, tongue jack, propane cover—to the outermost point at the rear, including spare tires, ladders, bike racks, or cargo carriers.
Even a “30-foot” trailer can easily measure 33–35 feet in real-world terms once you account for everything on the frame.
Width matters just as much. While most RVs travel at around 8–8.5 feet wide, that changes dramatically when your slides are out. Some rigs expand to 12, 14, or even 16 feet of total width. Measuring with slides fully extended prevents you from booking a campsite where you can’t actually open your RV once you’re parked. Tight sites, trees, posts, and neighboring rigs become major limiting factors if you don’t know your expanded footprint.
Know Your Full Height Clearance
Height is the dimension most new RVers underestimate—and it’s the one that can cause the most expensive damage. RV height is measured from the ground to the tallest point on the roof, which is usually the A/C unit, satellite dish, or vent cover, not the center of the roofline.
Most towables fall between 11 and 13 feet tall. Many Class A motorhomes sit around 12–13.5 feet. Once you get above 13 feet, you need to be extremely aware of tree limbs, older campground entrances, low bridges, and power lines.
Knowing your real clearance gives you the confidence to navigate roads, tunnels, and campground loops safely. It also helps you avoid sites where low overhangs or slanted terrain could bring you dangerously close to scraping your roof components.
Factor in Slides, Awnings, and Accessories
Slides are game-changers for interior space—but they can create big challenges at the campsite. A single large slide can require anywhere from 2 to 4 extra feet of space on one side of your RV. If you have slides on both sides, you need a wide-open site with room to spare.
Awnings also extend out several feet, and while you won’t always need to deploy them, it’s important to know how much overhead and side clearance they require so you’re not hitting tree branches or scraping posts.
Roof accessories matter too—solar panels, skylights, Wi-Fi antennas, storage pods, and factory A/C shrouds can add unpredictable inches to your total height. The older the campground, the more likely you’ll encounter tight areas, leaning trees, or uneven terrain that shifts the angle of your rig and reduces clearance on one side.
Why Accurate Dimensions Make All the Difference
When you know your RV’s true dimensions, you book smarter and travel safer. You avoid sites you can’t actually fit into, prevent roof and slide damage, and eliminate the stress of guessing whether something will clear. The more accurate your numbers are, the easier it is to choose campsites that give you the space and comfort your setup requires.
Pro Tip: Save your exact measurements in your phone’s Notes app or glove box. When booking, add 1–2 feet of buffer space to every dimension—you’ll thank yourself when parking day comes.
Match Your RV Type to the Right Campsite
Not every campsite is built for every rig, and that’s not a bad thing — it just means you book smarter when you know what your RV really needs. Campgrounds vary a lot, but most follow a few predictable patterns: smaller loops and older state/national parks favor shorter rigs, while private parks and newer resorts are designed with bigger pads, wider turns, and heavier hookups. Once you understand where your rig fits best, trip planning gets easier and way less stressful.
Class A and Super C Motorhomes (33–45 feet)
Big rigs can be pure comfort on the road, but they need campgrounds that were built with modern RV sizes in mind. Many state and national park sites top out around 27–35 feet for pad length, and some loops simply can’t handle the turning radius or height of a full-size Class A. National Parks Traveler+1
Where they shine is in private RV resorts, newer state parks, and parks that advertise “big-rig friendly” pull-throughs. Most Class A and Super C coaches are 50-amp rigs, meaning they’re designed to use 50-amp pedestals when available; they can run on 30-amp with an adapter, but you’ll be load-managing appliances. Thor Motor Coach+1
What to watch for when booking:
- Height clearances around entrances and trees (many big rigs sit 12–13+ ft tall).
- Pull-through or long back-in pads (40–50 ft sites are common in big-rig parks).
- Wide internal roads and turns (tight loops are the usual deal-breaker).
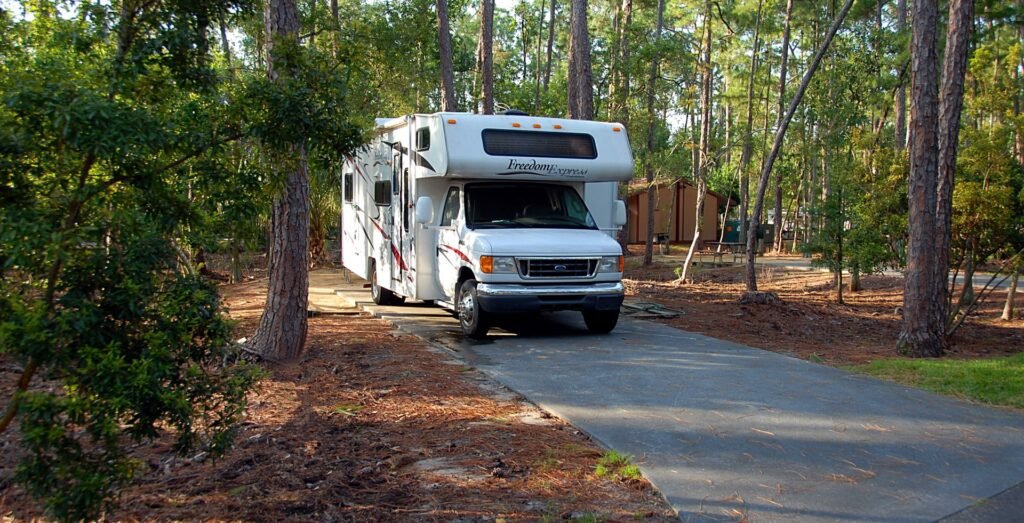
Class C Motorhomes (24–32 feet)
Class C rigs are the “fits-almost-everywhere” category. Most are short enough to get into a big chunk of state park and national park sites, while still giving you real living space. They usually run 30-amp service, although larger/newer Class C models sometimes come wired for 50-amp depending on the coach. KOA+1
Because of that flexibility, Class C owners rarely get boxed out of a campground — you just want to verify the pad length and turning layout if you’re at the top end of that size range.
The sweet spot for Class C booking:
- Standard back-ins in public parks.
- Private campgrounds where you want full hookups.
- Scenic loops where Class A’s can’t comfortably go.
- Easily fit into most state and national parks.
Class B Camper Vans (17–23 feet)
Class B vans are the freedom rigs. Their size opens up the widest range of camping styles — national parks, forest roads, beach spots, even some places posted “no large trailers.” Power-wise, most vans are 30-amp or smaller, and many are built specifically to thrive off-grid with solar and batteries. KOA
That means you’re not limited to full-hookup parks. You can choose by scenery first, convenience second.
Why Class B’s book so easily:
- They fit into almost any pad length category.
- They don’t need wide loops or pull-throughs.
- They’re ideal for boondocking and tight scenic areas.
Travel Trailers & Fifth Wheels
Because you tow them, always factor in your combined length (tow vehicle +Towables add one extra layer: your campsite has to fit your whole setup, not just the trailer. Campground listings usually give you the site pad length, not your combined length. So always think in two numbers:
- trailer length
- trailer + tow vehicle length
A 28-foot trailer behind a long-bed truck can easily need a site that’s 40 feet or more to sit comfortably without hanging into the road.
Fifth wheels often need less pad length than a similar travel trailer because the front overhang rides over the truck bed, but they do need:
- good turning room in the loop
- enough width for slide-outs
- hookups positioned where your sewer/water/electric lines can reach without stretching
Private parks usually handle towables well. Older public parks can be hit-or-miss depending on loop design and pad angles. trailer).
Pro Tip: When searching online, add your exact RV length to your keyword—like “RV sites 38 feet” or “50 amp pull-through.” Campground directories such as Campendium or The Dyrt often include user-verified length limits.
Pro Tip: If there’s extra space behind the campsite pad, you can pull your RV back until the rear wheels reach the edge of the pad. Let the overhang extend beyond the pad to fit a longer RV into a smaller site.
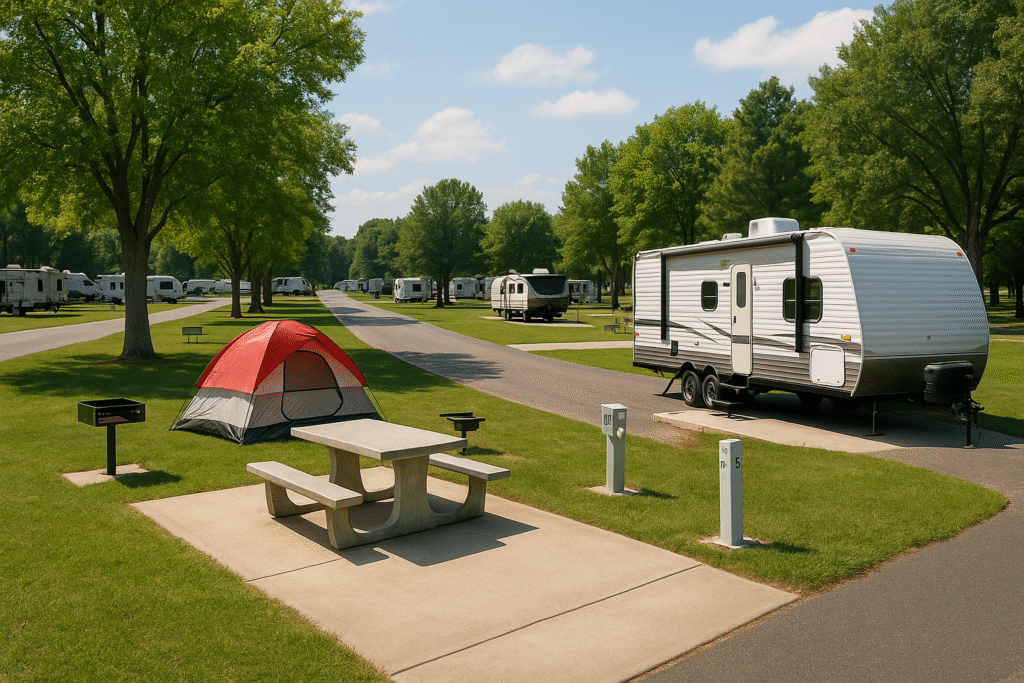
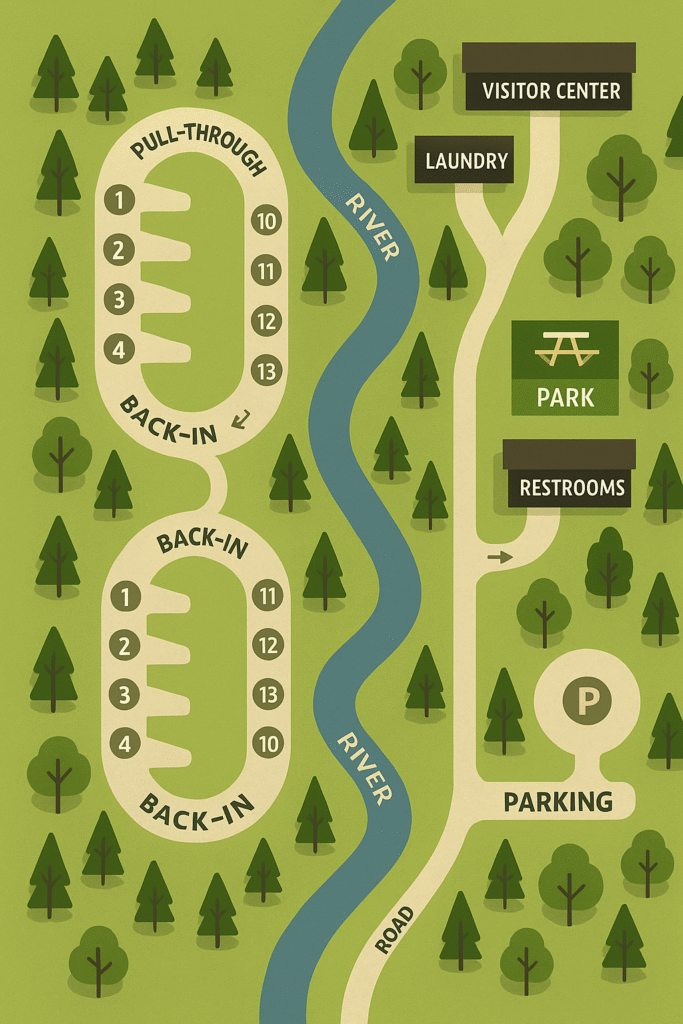
Understand Campsite Types and What They Actually Offer
Every campground labels its sites differently, and those labels can make or break whether your RV actually fits once you pull in. A “pull-through,” a “back-in,” a “premium,” or a “standard full hookup” site can mean completely different things depending on the campground, the age of the park, and how honest the listing is. Knowing what each site type really offers helps you avoid surprises when you arrive.
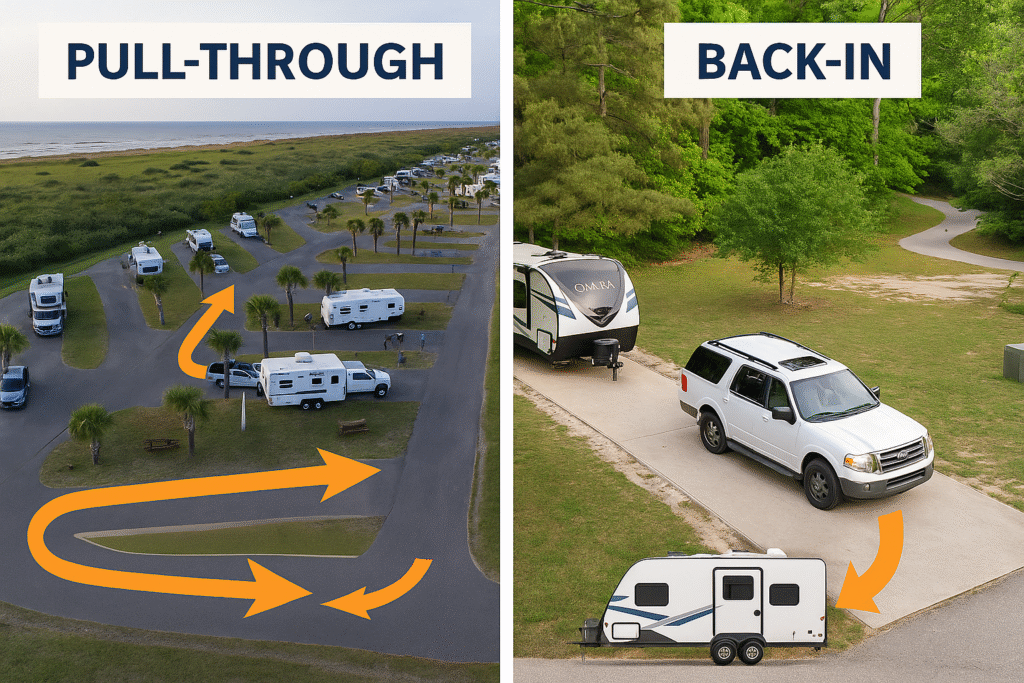
Pull-Through Sites
Pull-through sites are designed for straightforward arrival and departure. They’re the easiest option for longer rigs, big motorhomes, or anyone who doesn’t want to back a trailer through a tight loop. These sites usually offer enough length for your entire setup to stay connected, especially in private parks. But not all pull-throughs are created equal — older parks sometimes have narrow or angled pull-throughs that technically “count,” but feel cramped in practice.
- Ideal for Class A and large fifth-wheels that need space to maneuver.
- Great for overnight stays when you don’t want to unhook your tow vehicle.
- Usually positioned close to main campground roads for easy access.
- Expect to pay a $10–$20 premium per night at many parks.
- Slight downside: less privacy and more passing traffic.
Pro Tip: Reserve early—pull-throughs are often the first sites booked during peak travel months.
Back-In Sites
Back-in sites offer the most variety. Some are extra wide and perfectly level; others are short, narrow, and angled in ways that make backing a challenge. Public parks — especially state and national parks — rely heavily on back-in sites because they fit more naturally into scenic or older loops.
- Most campgrounds offer more back-in sites than pull-throughs.
- Usually set along outer loops or tucked into trees for shade.
- Perfect for Class C, B, and smaller travel trailers.
- Require backing into position—use a spotter, rear camera, or walkie-talkies for safety.
- Often 10–20 % cheaper than equivalent pull-throughs.
Full-Hookup
Full-hookup sites give you water, electric, and sewer directly at your pad. Private RV parks and resorts typically offer these, along with 30- or 50-amp power depending on your rig. Older public parks often provide electric + water only, and expect you to use a dump station before leaving.
50-amp isn’t “more power” — it’s two 120-volt legs that allow large rigs to run multiple appliances at the same time. Small rigs can still use 50-amp sites with the proper adapter, but the opposite isn’t true: a 50-amp rig on a 30-amp pedestal requires careful load management.
What to check:
- Whether your RV needs 30 or 50 amp
- Hose and cable reach — some sites place hookups way behind the pad
- Tree roots or uneven ground around the utility pedestal.

| 
| 
|
Our Rating:
4.6 | Our Rating:
4.5 | Our Rating:
4.7 |
$21.99
| ||
Description:
| Description:
| Description:
|
- Superior Dual RV Tank Dumping: Streamline dual tank dumping with the RhinoEXTREME 20' RV Sewer Hose Kit. Made with the toughest RV sewer hose, this complete kit ensures easy & efficient dual tank dumping, making your trips effortless & enjoyable.
- APPLICATION: The extension sewer hose is compatible with LITBM and CAMCO 3-inch RV sewer hoses, providing additional length to extend the reach of your RV's sewer hose
- The Ultimate RV Sewer Hose Kit: Camco’s Rhino RV Combo Kit combines the world's toughest RV hose with a complete, no hassle setup for reliable RV sanitation.
Partial Hookup Sites
Partial hookup sites give you water and electric, but no direct sewer connection. They’re extremely common in state parks, national parks, and older public campgrounds, and they tend to be a bit cheaper than full hookups. These sites work great for shorter trips, but you’ll need to keep an eye on your tank levels and plan a dump run every few days.
If you’re staying longer than a weekend, it’s smart to bring a portable waste tank (often called a “blue boy”) so you don’t have to break camp just to empty your gray or black tank. Many parks also have central dump stations, so it’s usually easy enough to empty your tanks before you head back on the road.
- Common in state and national parks.
- You’ll need to monitor tank levels and dump at the station every few days.
- Slightly cheaper than full hookups, and perfect for trips under a week.
No Hookup or “Dry Camping
Dry camping—also known as boondocking—means relying entirely on your RV’s onboard systems. There’s no water, no electricity, and no sewer connection. What you do get are the most peaceful, scenic, wide-open campsites you’ll ever stay in. National forest pull-offs, BLM land, and remote desert or mountain spots fall into this category.
To camp comfortably, you’ll want to arrive with full water tanks, charged batteries, and a good supply of propane. Most rigs can boondock comfortably for 3 to 5 days, depending on tank size, battery capacity, and how conservative you are with water and electricity. Solar panels or a small generator can stretch your stay even longer.
If you love quiet mornings, big skies, and having the entire view to yourself, dry camping delivers something hookups never will.
- Expect zero hookups — but you’ll often find the most scenic, quiet locations here.
- Stay 3–5 days with good conservation; use solar or generators to extend time.
Check the Road and Pad Before You Reserve
Before you hit “Book Now,” take a minute to look beyond the campsite photo and think about how you’ll actually get there. Many campgrounds were built long before modern RV sizes became the norm, which means narrow roads, aging tree cover, and tight pads can turn a dream reservation into a stressful arrival. A little scouting ahead of time goes a long way toward ensuring the site is truly accessible for your rig.
Road Access and Grades
Not every road leading into a campground is RV-friendly. Some routes include steep climbs, tight curves, or narrow approaches that can strain your engine, brakes, or nerves. Grades over 8–10% challenge even well-powered rigs, especially when towing. Before you arrive, preview the route using Google Maps satellite view so you know exactly what to expect.
If a campground specifically lists “RV-friendly” or “Big Rig Access,” that’s a strong sign they’ve accounted for modern RV sizes. But local staff will always know the best routes in and out. They’ll tell you which roads to avoid, where sharp switchbacks hide, and whether there are low branches or tight entrances that don’t show up on GPS.
- Roads with grades over 8–10% can challenge engines and brakes.
- Use satellite view in Google Maps to preview the road layout.
- If a park lists “RV-friendly” or “Big Rig Access,” that’s a good sign.
Clearance Hazards You Should Check First
Height clearance is one of the most overlooked campsite factors — until it’s too late. Approach roads may have tree limbs, dated infrastructure, hanging signs, or older bridges that sit lower than expected. A safe minimum clearance is 13 feet 6 inches for most large RVs, but if your rig is taller, some state parks and older campgrounds may be off-limits or require alternate entry points.
Apps like RV LIFE or Campendium often list “low clearance” warnings and user reports. Taking two minutes to verify overhead clearance protects your roof, A/C units, vents, and satellite domes from unwanted “trimming.”
Whether you’re a seasoned RV traveler or new to the lifestyle, the RV LIFE GPS is an essential tool for navigating with ease and peace of mind. With its customized turn-by-turn directions (specific to your RV’s height, weight, and length), you can journey with confidence.
Pad Length and Surface
A campsite’s listed pad length doesn’t always reflect usable length. Many parks measure the paved portion only, not the full area you can actually occupy. Your rig needs the full length of the tow vehicle plus the trailer or motorhome — and ideally an extra 2–4 feet to settle in comfortably.
The surface type matters just as much. Concrete is the most stable and level; gravel drains well but often requires extra blocks; grass or dirt can look great but become slippery or rutted after rain. Knowing what you’re parking on helps you prepare with stabilizer bases, SnapPads, or leveling gear so your jacks don’t sink or tilt overnight.
Slide-Out Clearance and Side-to-Side Space
Even if a pad is long enough, side clearance can be a different story. Trees, picnic tables, fire rings, posts, and even utility pedestals can limit how far your slides can extend. When in doubt, ask the campground directly about slide-out room for your specific model. Some parks will allow the host to move a table or fire ring, but you can’t always count on that once you arrive.
The goal is simple: confirm that when your slides are fully out, you can still walk comfortably around your RV, access storage bays, and avoid scraping branches or bumping into obstacles at night.
Amenities and Location Factors That Matter
Once your RV fits the site and the hookups line up with what you need, the next step is choosing a spot that actually feels good to stay in. The best campsites balance peace, convenience, and scenery—giving you a relaxing stay without sacrificing easy access to what matters most.
Restrooms, Showers, and Laundry
Even if your RV has its own bathroom and shower, campground facilities can make life easier—especially for families or longer stays. Always take a moment to check reviews for cleanliness, water pressure, and temperature consistency. Premium campgrounds often offer private shower rooms and 24-hour laundry, which can be a huge time-saver. If you’re traveling often or staying multiple nights, look for campgrounds with on-site laundromats that have several machines. A small laundry room with one or two washers almost always leads to long lines.
Pro Tip: Bring a collapsible laundry basket and detergent pods to keep things tidy inside your RV.
Dump Stations and Water Access
If you’re staying at a partial-hookup or dry-camping site, easy access to dump stations becomes very important. Look for campgrounds that provide multiple dump lanes or wide approaches—tight turns and long lines can turn a simple task into a frustrating chore. It’s also helpful to check whether the park has both non-potable rinse water and a separate freshwater fill station. Many RVers use Campendium or AllStays to preview dump-station layouts before they arrive, which makes planning much smoother.
Campground Stores and Propane
A well-stocked campground store can save you from a mid-trip supply run. Parks that carry basic groceries, RV parts, firewood, ice, and snacks make life much easier. If you rely on propane for cooking, heat, or refrigeration, it’s worth confirming whether the campground sells propane on-site. Having to break camp to refill tanks—especially in a big rig—is something every RVer tries to avoid.
- Larger resorts may offer full general stores and propane refills.
- Smaller or remote parks might only sell firewood and ice.
- Always check whether propane refills are available on-site or nearby — it’s easy to overlook until you’re out.
Recreation and Pet Amenities
The best campgrounds keep both people and pets happy. If you have kids, look for parks with pools, playgrounds, walking trails, or bike rentals. Family-oriented RV resorts often host movie nights or activities that make evenings more fun. If you’re traveling without kids and want a quieter experience, look for adult-only loops or designated quiet zones. Pet owners should check for dog parks or walking areas and confirm any breed restrictions or leash-length rules before booking.
Pro Tip: If traveling with pets, confirm breed restrictions and leash length rules before booking.
Location and Scenery
Campsite surroundings are just as imWhere your site sits inside the campground matters just as much as the site itself. Waterfront and mountain-view sites cost more, but they deliver daily rewards. Sites near the entrance give you quick access but usually come with more road noise. Perimeter or corner pads offer extra space and privacy. And if you work remotely, you’ll almost always get a stronger Wi-Fi signal near the campground office or closer to Wi-Fi towers.portant as amenities.
Pro Tip: For perfect balance, pick sites halfway between the entrance and perimeter loop — quiet, convenient, and easy to exit on travel day.
Location and Accessibility Factors That Matter
Even after you find a site with the right size and hookups, where it sits inside the campground can completely change your stay. A site can look perfect on paper, but if it’s hard to reach, too noisy, or far away from what you actually want to do, it becomes a daily frustration instead of a relaxing basecamp.
Proximity to Attractions
Staying close to the places you actually plan to visit makes a huge difference in how your day flows. Most RVers find that being 15–30 minutes from main attractions gives the best balance of convenience and quiet. Popular parks near lakes, beaches, and trail systems often fill months in advance, so planning early pays off.
If you expect to explore daily, choose campgrounds with easy road access and minimal gate hours or restrictions so you’re not losing time every morning just trying to get out.
Pro Tip: If you’ll be visiting local attractions multiple days in a row, map your daily route in Google Maps to estimate fuel usage and driving time before booking.
Road Noise and Peace
A beautiful campsite isn’t much fun if it comes with highway noise all night. Sites near the entrance or exit of a park are easier to reach, but they’re also right where early-morning departures, diesel startups, and traffic tend to happen.
If you want a quieter stay, look toward the back loops or perimeter pads. Just keep in mind that these areas might mean a slightly longer walk to amenities like restrooms or laundry.
Every campground handles generator rules differently, and some parks are strict about quiet hours—important if you’re arriving late or boondocking nearby.
Accessibility Inside the Campground
Some campgrounds were designed decades ago, before long fifth wheels and Super Cs became common. Narrow loops, tight corners, and tree-covered roads can turn a simple drive into a stressful crawl. Look for wide internal roads, gentle turns, and clear approaches on satellite view or RV apps.
Low-hanging branches are one of the most common causes of roof and air-conditioner damage. Interior loops with older trees should always be approached slowly, especially at dusk when shadows hide obstacles.
Pro Tip: Arrive before dusk. Even the best GPS can’t show potholes, ditches, or tree limbs hiding in the shadows.
Cellular Signal and Wi-Fi
If you rely on connectivity for work or navigation, it’s worth planning ahead. Campground cell service can vary dramatically—even within the same park. Checking reviews on Campendium helps you see real-world signal tests by carrier, not just tower maps.
If you work remotely, consider carrying a cell booster or starlink. Sites closer to offices, lodges, or Wi-Fi towers typically offer more stable streaming and faster upload speeds.
Site Position and View
Where your site faces makes a bigger difference than people expect.
North-facing sites stay cooler in summer, while south-facing pads catch more warm sunlight in cooler seasons. Corner and edge sites offer better airflow, privacy, and outdoor space. Waterfront or premium view pads usually cost more, but they’re often the sites people remember longest.
If your trip is all about relaxing outside, your site’s exposure to sun, shade, and scenery matters just as much as size or hookups.
Pro Tip: Before booking, look up your site number in Google Images or on social media. Many campers post photos that reveal actual shade, spacing, and road layout—better than any campground map.
Reservation Strategies and Tips
Finding the perfect campsite doesn’t help much if it’s already booked. With RV travel more popular than ever, the best destinations fill up months in advance — sometimes within minutes. A little planning goes a long way here. When you know when to book, what tools to use, and what to ask before you commit, you’ll land better sites with far less stress.
How Far in Advance to Book
The best time to book depends entirely on the season and how popular the park is. Some places give you plenty of time; others disappear almost instantly.
During summer weekends and holidays, expect heavy demand. Most RVers reserve 6–12 months ahead, especially for lakes, beaches, and mountain destinations.
National parks and coastal campgrounds usually open their booking windows about 6 months in advance — and the top sites can be gone in minutes.
For shoulder season travel (spring or fall), planning 1–3 months ahead is usually enough unless it’s a major destination.
In the off-season, weekdays often stay wide open. It’s common to score great sites with just 1–2 weeks’ notice, depending on the park.
Pro Tip: Many park systems open reservations exactly six months to the day — set a reminder and book right when the window opens.
Use Multiple Tools and Alerts
Don’t rely on one site or app. Combine severNever rely on just one website — each platform sees different cancellations and inventory.
Recreation.gov handles federal lands and most national parks.
ReserveAmerica manages a huge number of state parks.
Apps like Campendium, The Dyrt, and Hipcamp help uncover unique private sites with real-world reviews.
And alert services like Arvie, Campnab, and Campflare notify you the moment a canceled site becomes available.
Using a combination of tools dramatically improves your chances of snagging the site you actually want.al for better odds:
Pro Tip: Create a shortlist of 3–5 backup campgrounds within 30 minutes of your first choice.
What to Ask When Booking
A quick phone call can save major headaches later. Ask:A quick phone call can prevent major surprises when you arrive. Before confirming a site, ask:
- What is the exact pad length and width?
- Are there any posts, trees, rocks, or obstacles near the pad?
- Where are the hookups located?
- Does the site get afternoon shade?
- What is the road width and grade leading to the site?
These details matter — especially for larger rigs or tight park loops.
Pro Tip: Always confirm the site number and loop name, then look up real photos of that exact site on Google Images, Campendium, or Facebook groups.
Last-Minute Openings
Even fully booked parks get cancellations. You just need to know when to look.
Start checking 3–7 days before your arrival — this is when most cancellations get released back into the system. Many booking platforms instantly refresh their inventory, so persistence pays off.
If you’re flexible, shifting your arrival by just one day can often make a spot appear.
Understand Cancellation Policies
Policies vary wildly from one campground to another.
Most private parks offer full refunds up to seven days before arrival.
State and national parks sometimes charge a small fee ($10–$15), and many only refund you if you cancel early enough.
A no-show at many parks means losing one full night — or even your entire reservation in some systems.
Pro Tip: If you’re unsure about travel plans, look for flexible cancellation filters on sites like The Dyrt or KOA.

Special Considerations for Different RV Sizes
RV size has the biggest impact on which campsites will actually work for you. A 45-foot Class A behaves nothing like a 23-foot camper van, and a mid-size travel trailer sits right in the middle with its own quirks. Thinking ahead about length, turning space, and power needs will save you from tight squeezes, wrong turns, and dead-end loops where you can’t even unhook.
Large RVs (Class A and Big Fifth Wheels – 35 to 45 feet)
Big rigs need extra room and infrastructure built for heaBig rigs demand room — long pads, wide turns, and infrastructure designed for heavy loads. If you’re traveling in this size category, focus on parks that advertise big-rig-friendly access and newer loops with wide interior roads. Older campgrounds, especially those built before the 2000s, often have tighter curves, low branches, or narrow entrances that can turn an easy arrival into a stressful one.
You’ll want 50-amp sites whenever possible, not just for power but because those sites are usually designed with longer pads and straighter pull-through approaches. Daylight arrivals help tremendously — branches, posts, and tight corners are a lot easier to judge with natural light than headlights and shadows.
Pro Tip: Call ahead and ask what the longest RV they’ve hosted is — it’s a quick reality check before booking.
Mid-Size RVs (Class C and Travel Trailers – 25 to 35 feet)
This range is the “sweet spot.” You’re small enough to fit into most state and national park sites, but large enough to still enjoy real comfort. Most campgrounds are designed around rigs in this size bracket, which gives you plenty of flexibility when choosing sites.
Back-in sites tend to work best for mid-size rigs — they’re usually more spacious, quieter, and give you better views than the busiest pull-through lanes. In mild weather, you can save a little money by choosing 30-amp sites, as long as you’re smart about managing loads.
Keep a close eye on slide-out clearance when trees, posts, or picnic tables sit near the pad edge. Just because a site is “long enough” doesn’t mean the sides will open safely.
Pro Tip: A wireless backup camera or a simple pair of walkie-talkies makes setup smoother and avoids miscommunication when space is tight.
Small RVs (Class B Vans and Mini Trailers – under 25 feet)
Small rigs are the most versatile option. You can slip into tent sites, mixed-use loops, older campgrounds with strict size limits, and tight national park pads that would be impossible for anything larger. If you enjoy boondocking, this size class excels — forest roads, BLM land, and remote trails are often much more accessible when you’re under 25 feet.
Your size opens up scenic, hard-to-reach spots that bigger rigs simply can’t dream of. National park campgrounds often have strict maximums, and this is where small rigs shine with their ability to tuck into older sites built decades before modern RV sizes ballooned.
Pro Tip: Search the phrase “length limit” + campground name before you book national park sites — many restrict rigs to 27 feet or less, and some measure vehicle + trailer combined.
Whether you’re piloting a 45-foot Class A or towing a compact camper, everything comes down to knowing your real measurements and choosing sites designed for your size. A site that’s perfect for one rig might be an absolute no-go for another. Preparation is everything — when you understand your length, width, and height, every arrival becomes smoother, safer, and far less stressful.
Seasonal Camping Considerations
The time of year you travel can change everything—from comfort to campground availability to the gear you’ll need on hand. Whether you’re braving frozen hookups in January or baking under a July sun, knowing what to expect in each season helps you choose the right site and stay comfortable the entire trip.
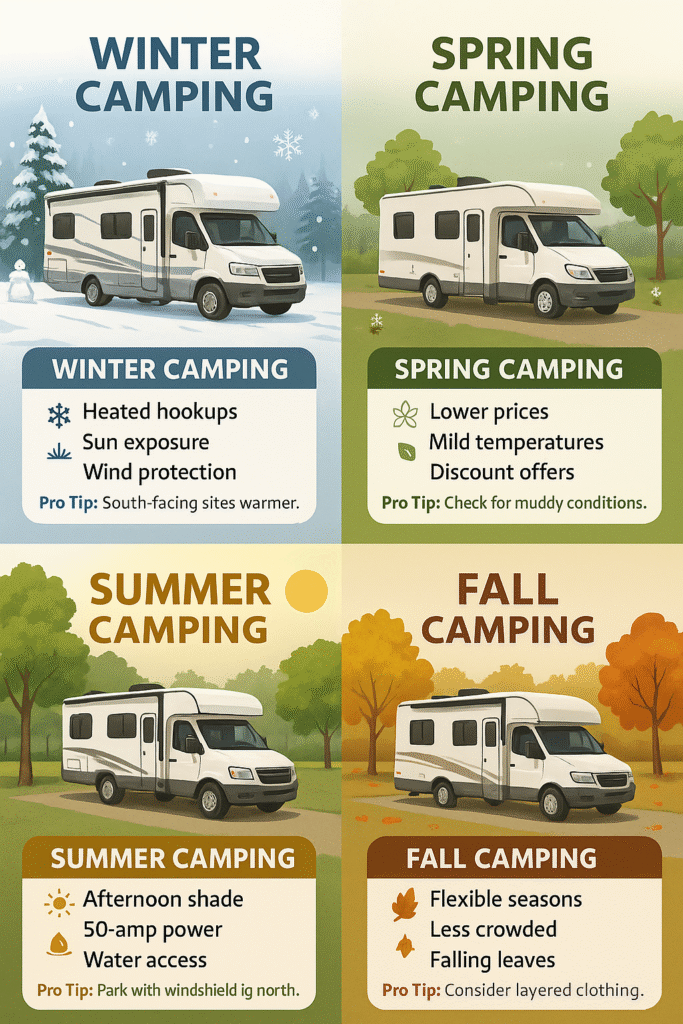
Winter Camping
Cold-weather RVing can be beautiful, but it comes with real challenges. Water lines freeze quickly, pads stay icy all day, and daylight is limited, which makes maneuvering around tight sites a lot harder. Before booking, always confirm whether the campground offers heated water hookups or plan to bring a heated hose of your own. Sun exposure matters in winter, so it’s usually best to avoid shaded pads—those never warm up and can stay slick for days.
Wind protection is a big deal too. Loops near trees, buildings, or natural windbreaks make a noticeable difference in comfort and heat retention. Some campgrounds close entire loops during winter, so checking the map beforehand prevents surprises. Expect reduced amenities as well—laundry rooms, pools, and some stores are often closed in the off-season.
Pro Tip: Southern-facing sites warm up faster in winter and melt ice sooner. They’re perfect if you love stepping outside for morning coffee without freezing.
Pro Tip: Southern-facing sites stay naturally warmer in winter—perfect for morning coffee outside.
Summer Camping
Hot weather brings different prioritieHot-weather camping flips the priorities completely. Shade becomes your best friend, and airflow inside the RV can make or break your stay. Sites with mature trees, or afternoon shade on the passenger side, stay noticeably cooler. If you plan to run multiple A/C units, 50-amp service is the safest bet.
Avoid blacktop pads whenever possible—they absorb heat all day and radiate it straight into your rig at night. Campgrounds with access to lakes, pools, or rivers give you natural cooling options, especially during heat waves. And always double-check generator rules; many campgrounds restrict hours during quiet times, which matters if your A/C depends on generator backup.
Pro Tip: Point the RV’s windshield north whenever possible. It keeps direct sun off the largest glass surface and dramatically lowers afternoon heat inside.s.
Spring and Fall (Shoulder Seasons)
Spring and fall are often the best times to camp—cool nights, warm afternoons, and far fewer crowds. Campgrounds usually feel more relaxed and easier to book, and you’ll often find 20–40% discounts in these months. Conditions on the ground do shift though. Spring brings mud from snowmelt and rain, while fall can mean soft pads covered in wet leaves.
The temperatures can swing hard, sometimes 35–40 degrees between morning and afternoon. This is where having the right layers and easy-to-adjust ventilation makes the biggest difference. If you’re hiking, cooking outside, or boondocking, shoulder seasons give you long, comfortable days without extreme temperatures on either end.
Pro Tip: Bring flexible-layered clothing—weather can swing from 40° mornings to 75° afternoons.
No matter the season, a little planning ahead for weather and site conditions can turn a good trip into a great one. Adjusting your setup and choosing the right campsite for the time of year keeps your RV protected, saves energy, and makes the whole experience far more enjoyable.
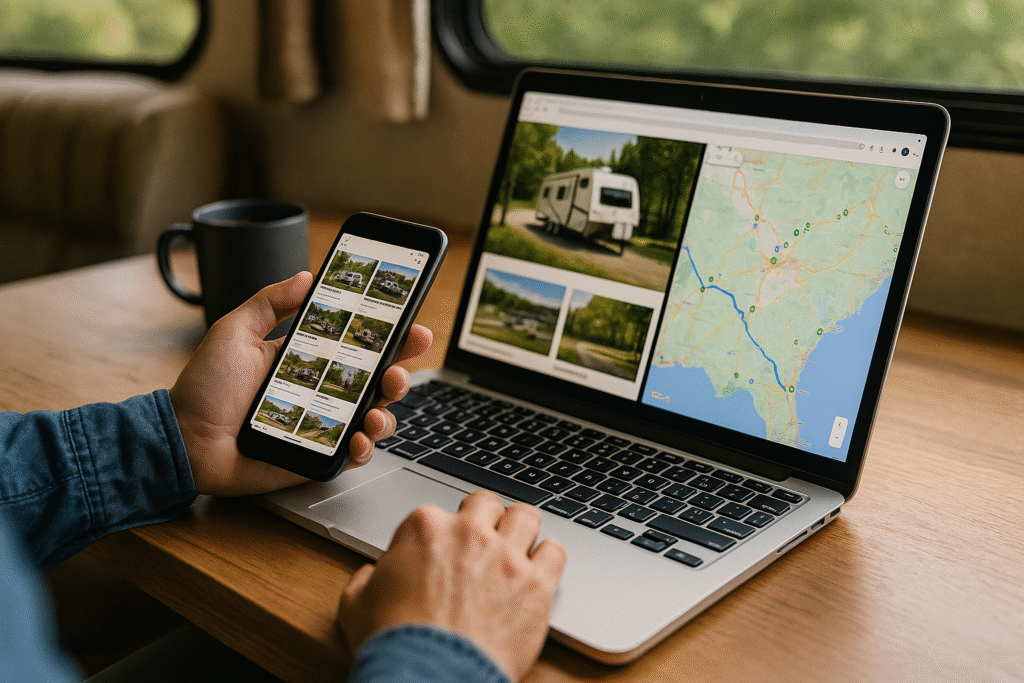
Resources and Tools for Finding the Perfect Campsite
Once you know your RV’s dimensions, the type of site you need, and when to book, the right tools can make campsite hunting easy. These websites and apps help you find verified, RV-friendly spots that fit your rig and travel style.
Best Campground Review and Booking Sites
The most accurate campsite decisions come from real photos, real reviews, and real RVers. These platforms make that easy.
- Campendium – Detailed reviews, cell-signal reports, and user photos (great for boondocking).
- The Dyrt – Massive database with filters for hookups, site type, and length.
- RV Life – Combines campsite reviews with RV-safe GPS routing.
- ReserveAmerica – For state parks and public lands across the U.S.
Pro Tip: Save your favorite apps in a dedicated “RV Travel” folder on your phone for quick access on the road.
Navigation and Route Planning
Before you hit the road, it’s worth confirming that your route is safe for your RV’s size and weight.
- RV Trip Wizard – Plots routes and campgrounds by your rig size.
- Google Maps (Satellite View) – Check road width and turn radius before arrival.
- Allstays Camp & RV – Find low-clearance alerts, propane fills, and dump stations.
- CoPilot GPS – Offline maps designed for RVs with size-based routing.
Pro Tip: Always compare at least two sources—some apps exclude older or smaller campgrounds by default.
Boondocking and Off-Grid Camping
If you love solitude, wide-open views, or free dispersed camping, these tools help you find the best off-grid locations.
- FreeRoam – Find public lands and dispersed sites.
- iOverlander – Crowdsourced listings for free and remote camping spots.
- BLM.gov – Official maps for Bureau of Land Management areas.
- Harvest Hosts / Boondockers Welcome – Overnight stays at farms, wineries, and museums (membership required).
Pro Tip: Bring offline copies of maps or GPS coordinates—many boondocking areas have little to no cell service.

Large 7” RV navigator offers a bright, high-resolution touchscreen to easily view your route and map updates of North America.
Find the best roads for your RV with custom routing for the size and weight of your RV.
With so many reliable tools at your fingertips, finding the right campsite becomes far less stressful. Using a mix of reviews, satellite images, routing apps, and RV-friendly databases ensures you always know what you’re driving into — from road width to site length to cell signal. When you combine real-world photos with size-aware GPS planning, you pick sites that truly fit your rig instead of rolling the dice on a campground map.
A few minutes of prep with the right tools can turn every trip into an easier, safer, and more relaxing adventure.
Conclusion: Finding the Perfect Campsite for Your RV
Choosing the perfect campsite for your RV comes down to one thing: matching your rig’s size, needs, and travel style to a site that truly fits. When you understand your RV’s real dimensions, know the difference between full hookups, partial hookups, and dry camping, and use reliable campsite-finding tools, you eliminate the guesswork that leads to tight turns, low-clearance issues, and uncomfortable stays.
By planning your route, checking pad length and surface, reviewing campground maps, and booking early during peak season, you set yourself up for a smooth arrival and a safer camping experience. Whether you travel in a Class A motorhome, a fifth wheel, a travel trailer, or a camper van, choosing the right site improves comfort, protects your RV, and helps you avoid costly mistakes.
A well-matched campsite means easier setup, quieter nights, better access to amenities, and a far more enjoyable trip. With the right preparation and the tools recommended in this guide, you’ll find high-quality RV campsites that fit your rig perfectly — no matter where you’re headed.
If you’re ready to plan your next trip with confidence, download the Free RV Campsite Fit Checklist (PDF) and use it before you book. It’s the fastest way to make sure every site you reserve is safe, comfortable, and truly RV-friendly.
Related Reading