
RV air conditioner not cooling? It can turn a relaxing summer camping trip into a miserable afternoon fast. The unit may be running, the fan may be blowing, and the thermostat may be set low, but the inside of the RV still feels warm and uncomfortable.
The good news is that an RV AC problem does not always mean the air conditioner is failing. In many cases, the cause is something simple, such as a dirty filter, blocked airflow, a thermostat setting, low campground voltage, or too many appliances running at the same time.
RV air conditioners also have to work much harder than home systems. An RV has thin walls, a hot roof, large windows, and very little insulation compared with a house. When the camper sits in full sun, heat can build inside faster than the air conditioner can remove it, especially during the hottest part of the day.
That is why an RV air conditioner may be working correctly but still struggle to keep the interior as cool as expected. The problem may be the temperature outside, the condition of the RV, the campsite location, or the electrical supply rather than the AC unit itself.
Before calling for service or assuming the air conditioner needs to be replaced, it helps to check the simple causes first. A few basic inspections can often improve airflow, reduce strain on the system, and help the RV cool down faster.
This guide explains what to check when your RV air conditioner is not cooling, how to recognize common airflow and power problems, and when the issue is serious enough to require professional repair.
Start With the Simple Things You Can Check Inside the RV
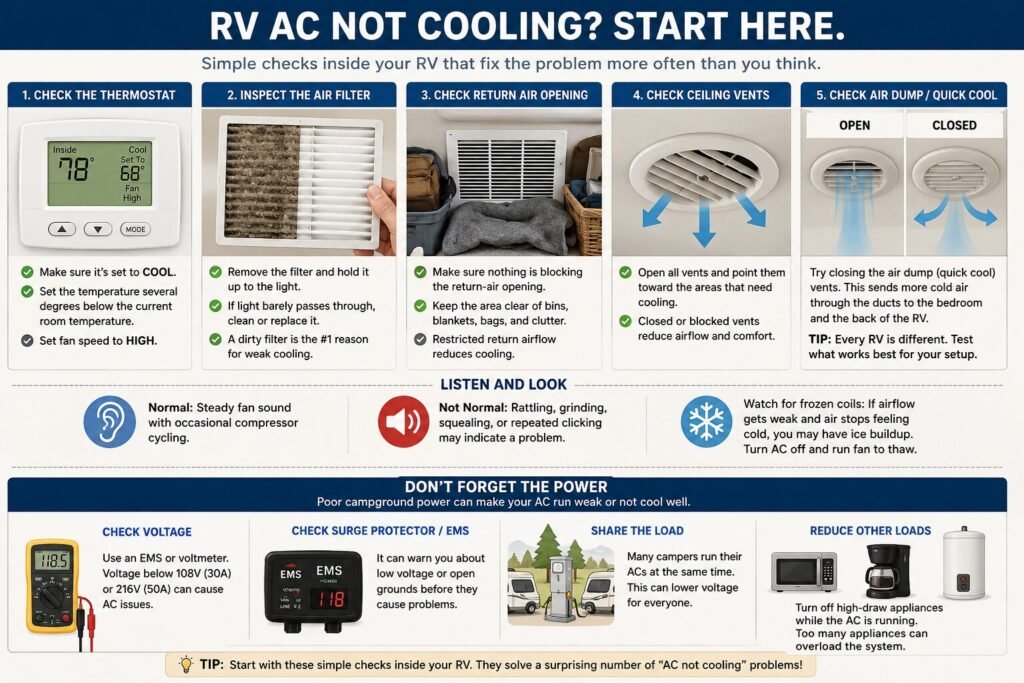
When an RV air conditioner is not cooling, the best place to start is inside the camper. Many cooling problems come from airflow restrictions, thermostat settings, or something blocking the return air. These issues are easier to check than rooftop components and can sometimes fix the problem without tools or a service call.
Begin with the thermostat. Make sure it is set to Cool, not Fan, Heat, or Auto. Then lower the temperature several degrees below the current room temperature. Some thermostats also have a fan-speed setting, so switch it to High if the RV is extremely warm.
Give the air conditioner a few minutes to respond. RV AC units do not always begin cooling the instant the thermostat is changed. The fan may start first, followed by the compressor. If the fan blows but the air never gets cooler, continue checking the airflow.
Next, inspect the air filter. A dirty filter can reduce airflow enough to make the RV air conditioner seem weak even when the unit is still running. Dust, pet hair, pollen, cooking grease, and campground dirt can build up faster than many owners realize, especially during heavy summer use.
Remove the filter and hold it toward a light source. If very little light passes through, it needs to be cleaned or replaced. Washable filters should be cleaned according to the manufacturer’s instructions and allowed to dry completely before reinstalling.
Check the return-air opening behind the filter as well. Nothing should be blocking it. Blankets, storage containers, cabinet doors, or loose insulation near the opening can restrict the air the unit needs to pull back into the system.
Then inspect the ceiling vents. Make sure they are fully open and pointed toward the areas that need cooling. Some RVs have ducted air conditioning, and a closed or damaged vent can reduce airflow in one part of the camper while other areas cool normally.
It also helps to close the quick-cool or air-dump vents near the AC unit and compare the result. On some systems, opening those vents sends most of the cold air straight down into the main room. Closing them pushes more air through the ceiling ducts toward the bedroom or rear of the RV.
Listen to the sound of the unit while it runs. A steady fan with occasional compressor cycling is normal. Rattling, grinding, squealing, or repeated clicking may point to a mechanical or electrical problem that needs more attention.
Finally, check whether the inside coil has started to freeze. Weak airflow, a dirty filter, or running the unit continuously in certain conditions can allow ice to build up. If airflow gradually becomes weaker and the air stops feeling cold, turn the AC off and let the fan run so the ice can melt before restarting it.
These simple checks are worth doing first because they address some of the most common reasons an RV air conditioner is not cooling. If the thermostat, filter, vents, and return air all look normal, the next step is to look at heat load and outside conditions.
Extreme Heat Can Make a Working RV Air Conditioner Feel Weak
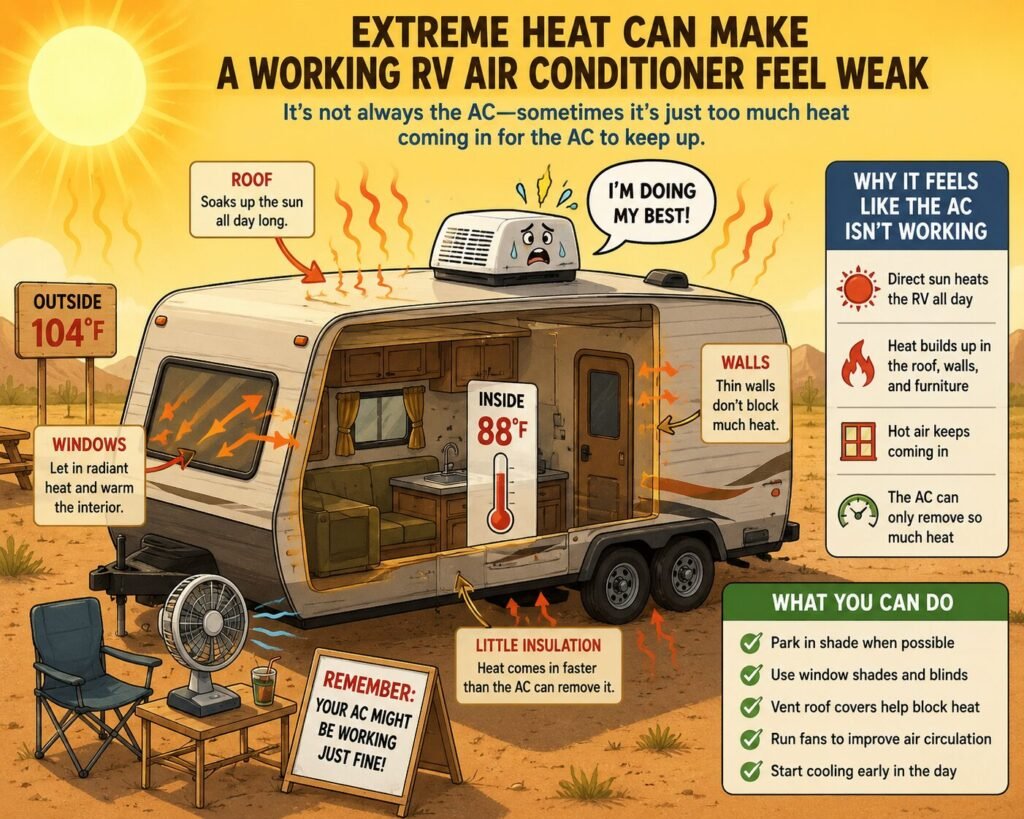
Sometimes the RV air conditioner is not cooling because the unit is failing. Other times, the AC is working as designed but cannot keep up with the amount of heat entering the camper. This is especially common during mid-summer when the RV is parked in direct sun and outside temperatures stay high for hours.
An RV heats up much faster than a house. The roof absorbs sunlight, the walls are thinner, the windows allow radiant heat inside, and the interior has less insulation. Even with the air conditioner running, heat can continue pouring into the camper faster than the AC can remove it.
That means the inside temperature may not drop as low as expected during the hottest part of the day. Many RV air conditioners are better at lowering the temperature by a reasonable amount than holding the interior at a house-like 68 or 70 degrees in extreme heat.
The temperature of the air coming from the vent can tell you more than the thermostat alone. If the air coming out feels noticeably cooler than the air entering the return vent, the unit may still be doing its job even though the RV remains warmer than you want.
A camper sitting in full afternoon sun may continue heating through the roof, windows, walls, and windshield. Large front windows in motorhomes, skylights, uncovered roof vents, and slide-out walls can add even more heat to the interior.
Campsite location makes a big difference. Parking where the afternoon sun hits the refrigerator side, largest windows, or main living area can make the RV much harder to cool. A shaded site may reduce AC strain significantly, even when the outdoor temperature is the same.
Window coverings can help more than many owners expect. Close blinds and curtains before the sun begins heating the interior. Reflective window covers, insulated vent cushions, windshield shades, and blackout curtains can reduce the amount of heat entering the RV.
The awning can also help if it shades the sun-facing side of the camper. Keeping direct sunlight off the walls and windows reduces the heat the air conditioner has to fight. Just remember to retract the awning during strong wind or storms.
Cooking inside adds another major heat source. Ovens, stovetops, air fryers, coffee makers, and other appliances can raise the temperature quickly. During extreme heat, cooking outside or preparing simpler meals can make it easier for the AC to keep up.
Opening the door repeatedly also allows hot, humid air to enter. Children, pets, and frequent trips in and out can slow the cooling process, especially in smaller RVs where the interior air volume changes quickly.
Humidity matters too. An RV may feel uncomfortable even when the temperature is slowly dropping because the air still holds a lot of moisture. The air conditioner has to remove both heat and humidity, which can make cooling feel slower in muggy climates.
Starting the AC early is often more effective than waiting until the camper is already overheated. Turning it on in the morning gives the unit a chance to maintain a manageable temperature instead of trying to pull a 95-degree interior back down during the hottest part of the afternoon.
Before assuming something is broken, compare the conditions inside and outside. If the AC is producing cool air but the RV is sitting in direct sun during extreme heat, reducing the heat load may improve comfort more than lowering the thermostat further.
Low Campground Voltage Can Make Your RV AC Struggle
When the inside checks look good and the weather alone does not explain the problem, campground power should be the next thing to investigate. An RV air conditioner depends on a steady supply of voltage, and low voltage can make the unit run poorly, trip breakers, or shut down before the camper ever gets comfortable.
This problem is especially common during hot summer afternoons when many campers are running air conditioners at the same time. Campground electrical systems can become heavily loaded, and the voltage at the pedestal may drop even though the outlet still appears to be working.
An RV AC may still turn on under low-voltage conditions, but that does not mean it is operating correctly. The fan may run, the compressor may struggle to start, or the unit may cycle off repeatedly. In some cases, the air coming from the vents feels only slightly cool because the compressor is not getting the power it needs.
Low voltage also creates extra heat inside motors and electrical components. This can shorten the life of the air conditioner, damage the compressor, and place more strain on the RV’s wiring and breaker system. RV Travel has a useful explanation of how low voltage can damage an RV air conditioner and other electrical equipment. This is why low voltage is more than just an inconvenience.
A true electrical management system can help identify the problem. Unlike a basic surge protector, an EMS monitors incoming voltage and can disconnect power when conditions become unsafe. If the EMS shows low voltage or repeatedly cuts power, the campground supply may be the real issue.
You can also check the pedestal with a voltmeter if you know how to do it safely. Normal campground voltage should stay close to the expected range, but a noticeable drop under load can signal trouble. Voltage may look acceptable before the AC starts, then fall once the compressor turns on.
Extension cords and adapters can make the problem worse. Long, undersized cords create voltage drop, and worn dogbone adapters or loose connections add resistance. The farther electricity has to travel through poor wiring or weak connections, the less voltage reaches the air conditioner.
A damaged or overheated plug can also reduce power. Check the shore-power cord, adapter, and pedestal connection for discoloration, melted plastic, looseness, or a hot smell. Stop using the connection if anything looks burned or feels unusually hot.
Running too many appliances at the same time can also pull voltage down inside the RV. Microwaves, coffee makers, electric water heaters, and battery chargers can all add to the load. On a 30-amp RV, this can become a problem quickly when the air conditioner is already using a large share of the available power.
Try turning off high-draw appliances and see whether the AC performs better. Switch the water heater and refrigerator to propane if available, avoid the microwave, and pause other electrical loads while the air conditioner is running.
If the AC starts cooling better after reducing the load, the problem may be limited power rather than a mechanical failure. If voltage remains low at the pedestal, moving to another site or contacting campground management may be the only practical solution.
Running Too Many Appliances Can Overload the RV’s Power
An RV air conditioner uses a large share of the available electricity, especially when the compressor starts. If several other high-draw appliances are running at the same time, the AC may cool poorly, trip a breaker, or shut off unexpectedly even when nothing is wrong with the unit itself.
This is especially common in 30-amp RVs. A single air conditioner, microwave, coffee maker, electric water heater, and converter can quickly use more power than the RV can safely handle. The breaker trips because the total demand is too high, not necessarily because the air conditioner has failed.
A 50-amp RV has more available power, but it can still be overloaded if multiple air conditioners and large appliances are running on the same leg of the electrical system. The number on the pedestal does not guarantee unlimited power.
Start by turning off the biggest electrical loads. Switch the water heater and refrigerator to propane if your RV allows it. Avoid using the microwave, toaster, air fryer, hair dryer, or coffee maker while the air conditioner is trying to cool the RV.
The converter can also add to the load if it is charging depleted batteries. After arriving at a campsite with low batteries, the converter may draw more power than usual while the AC is running. This can make an already limited electrical system feel even weaker.
Watch for patterns. If the air conditioner works normally until another appliance is turned on, the problem is probably total electrical demand. If the breaker trips every time the microwave or coffee maker starts, that is a strong clue that the RV is simply using too much power at once.
Extension cords and adapters can make this worse by creating voltage drop and heat. Even when the breaker does not trip, the air conditioner may receive less voltage and struggle to start or cool properly.
The simplest fix is to stagger appliance use. Let the air conditioner run by itself during the hottest part of the day, then use high-draw appliances one at a time. This reduces strain on the AC, wiring, adapters, and breaker panel.
If the breaker still trips with the other appliances turned off, the problem may be a weak breaker, damaged wiring, low campground voltage, or a failing air conditioner component. At that point, the issue needs a closer electrical inspection rather than more load management.
Dirty Coils and Rooftop Debris Can Reduce Cooling
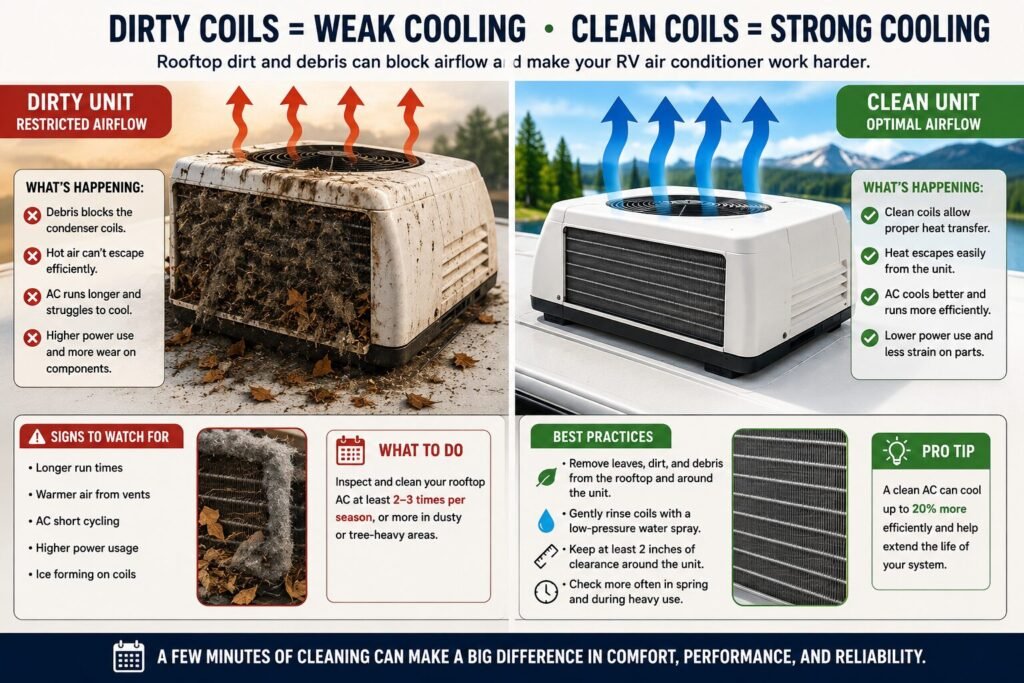
If the filter is clean, airflow is good, and the campground power looks normal, the next place to look is the rooftop unit itself. Dirt, leaves, cottonwood fluff, dust, and insect debris can collect around the air conditioner and reduce how well it moves heat out of the RV.
The outside condenser coil is especially important. Its job is to release heat from inside the camper. When that coil is clogged, the system has to work harder, run longer, and may still fail to cool the RV properly.
This kind of buildup is common during summer travel. Campgrounds with trees, dry dirt, pollen, and road dust can coat the rooftop unit faster than many owners expect. The AC may continue running, but the air coming from the vents may not feel as cold as it should.
The evaporator coil inside the unit can also become dirty. Even with a filter in place, fine dust and pet hair can sometimes reach the coil over time. A dirty evaporator coil reduces airflow and makes it harder for the system to absorb heat from inside the RV.
Before checking the rooftop unit, turn off shore power, switch off the AC breaker, and make sure the unit cannot start unexpectedly. Working on an RV roof can also be dangerous, so use a stable ladder and avoid climbing up in wind, rain, or extreme heat.
Remove the shroud only if you are comfortable doing so and the manufacturer’s instructions allow it. Look for visible debris around the coils, fan area, and drainage paths. Do not bend the delicate coil fins or spray high-pressure water directly into electrical components.
A soft brush, vacuum, or gentle coil-safe cleaning method is usually better than aggressive washing. The goal is to clear airflow without damaging the unit.
Check the rooftop fan while you are there. Cracked blades, loose hardware, or a fan that does not spin freely can reduce heat removal and create unusual noises. A damaged fan should be repaired before the AC is used again.
Also inspect the foam divider and seals between the return-air side and supply-air side of the unit. If those seals are loose or damaged, cold air can mix with warm return air before it reaches the vents, making the system feel weak even when the compressor is working.
Rooftop maintenance does not need to be constant, but it should be part of regular RV care. Cleaning the coils and clearing debris before the hottest part of the season can improve cooling and reduce strain on the air conditioner.
If the coils are clean and the unit still runs without producing cold air, the problem may involve the capacitor, compressor, refrigerant circuit, control board, or another component that usually requires professional service.
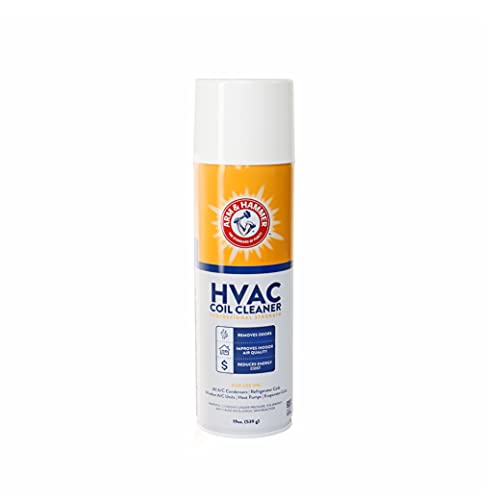
Keeping the HVAC coil clean helps it run more efficiently. This cleaner is great for that!
A Frozen Evaporator Coil Can Stop the Airflow
An RV air conditioner can sometimes look like it is running normally while very little cool air comes from the vents. One possible cause is a frozen evaporator coil. When ice forms on the coil, airflow becomes restricted and the unit can no longer move enough air through the system to cool the RV properly.
This usually starts with an airflow problem. A dirty filter, blocked return vent, closed ceiling vents, a weak fan, or a dirty evaporator coil can all reduce the amount of warm air passing over the coil. When the coil becomes too cold, moisture in the air freezes on its surface.
High humidity can make the problem worse because the air conditioner is pulling more moisture from the indoor air. If the system is already struggling with weak airflow, that extra moisture can quickly turn into ice.
One clue is that the air conditioner starts out cooling normally, but the airflow gradually becomes weaker. The fan may still be running, yet the air from the vents feels faint or stops feeling cold. In some cases, water may begin dripping once the ice starts to melt.
If you suspect a frozen coil, turn the cooling function off and leave the fan running. This helps move warmer air across the coil and allows the ice to thaw. Do not keep lowering the thermostat or restarting the compressor because that can make the icing worse.
While the unit is thawing, check the filter, return-air opening, ceiling vents, and air dump. Make sure nothing is blocking airflow and that the filter is clean and dry before restarting the system.
It can take a while for a frozen coil to thaw completely. Restarting the AC too soon may cause it to freeze again. Once airflow has returned and there is no visible ice or dripping from thawing, run the unit at a moderate thermostat setting and watch whether the problem returns.
Running the fan on a higher speed can sometimes help prevent freezing because more air moves across the coil. Avoid setting the thermostat extremely low and leaving the unit to run nonstop if the RV is already very humid or airflow is weak.
If the coil freezes repeatedly even after the filter and vents are cleaned, the problem may involve a weak blower motor, damaged ducting, dirty internal coils, a thermostat issue, or another mechanical problem. Repeated freezing is not something to ignore because it places extra strain on the compressor and can lead to larger repairs.
A frozen coil is often a symptom rather than the main problem. The real fix is restoring proper airflow and finding out why the coil became too cold in the first place.
Thermostat and Sensor Problems Can Cause Short Cycling
Sometimes an RV air conditioner cools for a few minutes, shuts off too soon, then starts again before the RV ever becomes comfortable. This is called short cycling, and it can make the unit seem weak even when the compressor is still capable of producing cold air.
The thermostat is one possible cause. If it is reading the wrong temperature, mounted in a poor location, or affected by direct sunlight, cooking heat, or cold air from a nearby vent, it may turn the AC on and off at the wrong times.
A thermostat placed directly under a supply vent can be especially misleading. Cold air may reach the thermostat before the rest of the RV has cooled, causing the system to shut down early. The room stays warm, but the thermostat thinks the target temperature has already been reached.
Check that the thermostat is firmly mounted and set to the correct cooling mode. Replace weak batteries if the thermostat uses them, and make sure the temperature setting is several degrees below the current indoor temperature.
Some RV air conditioners use a remote temperature sensor instead of relying only on the thermostat. If that sensor is loose, damaged, blocked, or positioned near a heat source, the system may receive an inaccurate reading.
Short cycling can also happen when the AC is overheating, the voltage is low, or the starting capacitor is weak. In those cases, the unit may shut down to protect itself, then restart after it cools.
Listen to the pattern. If the compressor starts, runs briefly, and stops over and over, avoid letting it continue for long periods. Repeated short cycles create extra stress because starting the compressor requires more power than normal operation.
Try reducing other electrical loads and check the campground voltage. If the cycling improves after the microwave, water heater, or converter load is reduced, the problem may be electrical rather than thermostat-related.
Also check whether the thermostat fan setting is causing confusion. In Auto mode, the fan may stop when the compressor stops. In On mode, the fan may continue blowing even when the compressor is not cooling. Warm air from the vents does not always mean the entire unit has shut off.
If the thermostat settings, sensor location, airflow, and voltage all look normal but the AC continues short cycling, the system may need professional diagnosis. A technician can test the capacitor, control board, compressor current, temperature sensors, and internal wiring.
Short cycling should not be ignored. Even when the RV receives some cool air, repeated starts and stops can reduce comfort, increase electrical strain, and shorten the life of the air conditioner.
When the RV Air Conditioner May Need Professional Repair
After checking the thermostat, filter, airflow, campground voltage, appliance load, rooftop debris, and possible coil freezing, some problems still point to a mechanical or electrical failure inside the air conditioner. At that point, continuing to restart the unit may cause more damage.
One warning sign is when the fan runs but the air never becomes cooler. If airflow is strong and the filter is clean, the compressor may not be starting. A failed capacitor, relay, control board, or compressor can all cause the fan to operate without producing cold air.
A loud humming sound followed by a click can also point to a starting problem. The compressor may be trying to start and then shutting down on overload. This can happen because of low voltage, a weak capacitor, or a failing compressor.
Burning smells, melted wiring, smoke, or a breaker that trips immediately should be taken seriously. Turn the air conditioner off and disconnect power. These symptoms can indicate an overheated connection, damaged wiring, or an internal electrical failure.
Unusual noises are another clue. Grinding, squealing, metal-on-metal sounds, or a fan striking the housing usually mean something mechanical needs attention. Continuing to run the unit can turn a smaller repair into a larger one.
Water leaking inside the RV may come from a blocked drain path, loose mounting gasket, damaged seal, or frozen coil. A small amount of condensation is normal, but repeated dripping into the ceiling or walls should not be ignored because it can lead to water damage.
An air conditioner that repeatedly short cycles after the thermostat and voltage have been checked may also need professional testing. A technician can inspect the capacitor, compressor current, temperature sensors, control board, and internal wiring.
Refrigerant problems are less common than dirty filters or weak power, but they are possible. RV air conditioners are sealed systems, so a refrigerant leak usually requires specialized tools and may not be practical to repair on every model.
Age matters too. If the unit is older, noisy, inefficient, and has already needed several repairs, replacement may make more sense than another service call. A newer unit may be worth diagnosing, especially if the problem is limited to a capacitor, fan motor, or control component.
Before scheduling service, write down exactly what the unit is doing. Note whether the fan runs, whether the compressor starts, how long it operates, whether the breaker trips, and what the campground voltage shows. That information can help a technician find the problem faster.
Knowing when to stop troubleshooting is part of protecting the RV. Simple checks can solve many cooling problems, but electrical testing, refrigerant work, and compressor repairs are safer in the hands of a qualified RV air-conditioning technician.
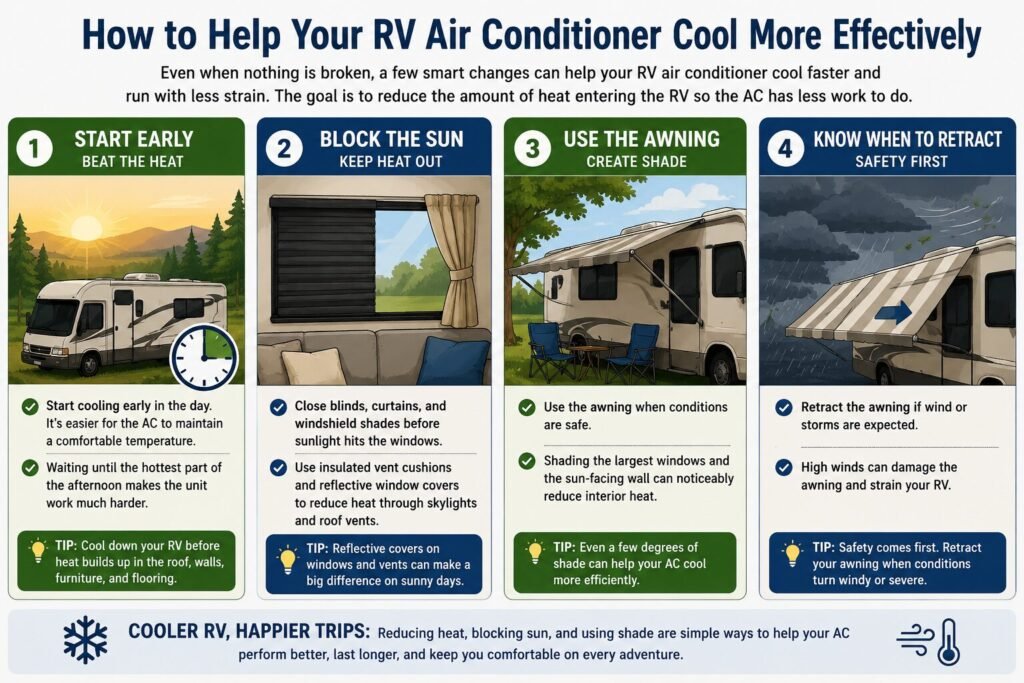
How to Help Your RV Air Conditioner Cool More Effectively
Even when nothing is broken, a few changes can help an RV air conditioner cool faster and run with less strain. The goal is to reduce the amount of heat entering the RV so the AC has less work to do.
Start cooling early in the day. It is much easier for the air conditioner to maintain a reasonable temperature than to cool an RV that has already turned into an oven. Waiting until the hottest part of the afternoon forces the unit to fight heat stored in the roof, walls, furniture, and flooring.
Close blinds, curtains, and windshield shades before direct sunlight reaches the windows. Insulated vent cushions and reflective window covers can also reduce heat coming through skylights and roof vents.
Use the awning when conditions are safe. Shading the largest windows and the sun-facing wall can noticeably reduce interior heat. Retract it if wind or storms are expected.
Run ceiling fans or portable fans to move cool air through the RV. Fans do not lower the actual temperature, but they improve circulation and can make the space feel more comfortable while helping prevent hot spots.
Keep interior doors open when possible so air can move between rooms. In a ducted system, make sure vents are open and aimed toward the warmest areas.
Avoid creating extra heat inside. Cook outdoors, use the microwave for short periods, or prepare cold meals during the hottest part of the day. Ovens, stovetops, air fryers, and other appliances can quickly add heat that the AC then has to remove.
Limit how often the exterior door is opened. Every trip in and out allows hot, humid air to enter, especially in smaller RVs.
Keep the filter clean and check it more often during dusty trips, pet travel, or heavy summer use. Good airflow is one of the simplest ways to help the system perform properly.
If the RV has two air conditioners, begin cooling with both units before the interior becomes overheated. Once the temperature stabilizes, one unit may be able to maintain comfort depending on the weather and RV size.
A soft-start device may help the compressor start more smoothly when using a generator or limited campground power. It does not make the AC produce colder air, but it can reduce startup demand and make the system easier to operate under certain conditions.
Finally, protect the unit from poor power. A quality electrical management system can monitor voltage and disconnect the RV when campground power becomes unsafe.
These steps will not fix a failed compressor or electrical problem, but they can make a working RV air conditioner much more effective during extreme summer heat.
Final Thoughts on an RV Air Conditioner Not Cooling
When an RV air conditioner is not cooling, the cause is often easier to find than it first appears. A dirty filter, blocked airflow, extreme heat, low campground voltage, or too many appliances running at once can all make a working AC unit seem weak.
The best approach is to start with the simplest checks inside the RV. Confirm the thermostat settings, inspect the filter, open the vents, and make sure the return air is not blocked. Then look at outside heat, shade, campground power, and appliance load before assuming the air conditioner has failed.
It also helps to pay attention to exactly what the unit is doing. Strong airflow with warm air points in a different direction than weak airflow, repeated breaker trips, short cycling, or unusual noises. Those details can narrow down the problem and prevent unnecessary repairs.
Some cooling limits are normal during extreme summer weather. An RV air conditioner may be working correctly and still struggle to maintain a house-like temperature when the camper is sitting in full sun. Reducing heat through the windows, roof, and walls can make a noticeable difference.
Regular maintenance matters too. Clean filters, clear rooftop coils, good electrical connections, and proper airflow help the unit cool more effectively and reduce strain on the compressor.
If the fan runs but no cold air is produced, the breaker trips immediately, the unit smells burned, or the compressor repeatedly fails to start, stop using it and have the system inspected. Electrical and compressor problems are not worth risking further damage to the air conditioner or RV.
A few careful checks can solve many RV AC problems without a service call. When the issue is more serious, knowing what you have already tested will make it easier for a technician to diagnose the problem and get the RV comfortable again.

Upgrade your RV's cooling with this airflow kit. Cools faster and improves airflow by 40%!
Learn More About RV Power and Cooling Problems
RV air-conditioning problems are often connected to campground power, overloaded circuits, low voltage, or the rest of the RV electrical system. These guides explain those issues in more detail.