When you arrive at a campground for the first time, the hookups can look confusing. Water hoses, sewer connections, and electrical pedestals are all sitting there waiting, and if you’re new to RVing it’s easy to wonder:
What order do I hook everything up in?
Many first-time RV owners feel a little unsure during their first campground setup. With several connections sitting in front of you and other campers nearby, it can feel like everyone else already knows exactly what to do.
The good news is that RV campground hookups are actually simple once you understand the process. Most experienced RV owners follow the same setup routine every time they arrive at a campsite. After you’ve done it a few times, the entire process becomes quick and automatic.
The key is understanding how the campground systems work together and connecting everything in a smart order. Electricity, water, and sewer hookups are designed to be straightforward, but connecting them correctly helps protect your RV and makes the entire setup process smoother.
In this RV campsite hookup guide, I’ll walk you through the exact step-by-step process for connecting campground electric, water, and sewer hookups safely and correctly. Once you understand the routine most experienced RV owners use, you’ll be able to set up your campsite quickly and confidently every time you arrive.
If you’re new to RV camping, you may also want to review the basic equipment most RV owners carry with them. Our First-Time RV Starter Essentials guide covers the gear beginners often forget when setting up at a campground for the first time.
The RV campsite hookup guide: Position the RV at the Campsite
Before connecting any utilities, the first step is positioning your RV correctly in the campsite. Depending on the campground layout, you may need to pull into the site or back the RV into position so your utility connections line up with the campground hookups.
Most campsites place the utility pedestal on the driver’s side of the RV, which is where your electrical cord, water inlet, and sewer connection are typically located. As you pull in or back into the site, take a moment to look at where the hookups are positioned so you can stop with your RV close enough for your hoses and power cord to reach comfortably.
Not every campsite is laid out perfectly. In some parks the sewer connection, electrical pedestal, or water spigot may be farther away than expected. Because of this, many RV owners carry longer water hoses, sewer hose extensions, or electrical extensions so they can comfortably reach the campground hookups even when the pedestal isn’t in the ideal location.
Once the RV is in the correct position, place the transmission in park and set the parking brake. Securing the RV before you begin setup helps prevent movement while you’re walking around the campsite connecting utilities.
After the RV is parked, the next priority is making sure the RV is stable and sitting level in the campsite. Proper leveling helps appliances like refrigerators operate correctly and keeps doors, cabinets, and slide-outs working smoothly.
Many RV owners use leveling blocks or built-in leveling systems to correct uneven campsites. Wheel chocks are also commonly used to prevent the RV from rolling once it is parked.
If you want a deeper explanation of these setup steps, you can read our guides on how to level an RV at a campsite and how to use RV wheel chocks safely, which explain those processes in more detail.
Once the RV is positioned and stable, you’re ready to begin connecting the campground hookups.

Connect the Electrical Power First
Once your RV is positioned and stable in the campsite, the first utility most experienced RV owners connect is the campground electrical power. Having electricity available right away allows you to run lights, operate appliances, and finish setting up the campsite comfortably.
Many RV owners also like to have shore power connected before extending slide-outs. While most slide systems operate from the RV batteries, plugging into campground power allows the batteries to charge while you’re setting up and ensures the electrical system has plenty of power available.
Before plugging anything into the campground pedestal, take a moment to look at the electrical box. Most campground pedestals provide multiple outlet types, typically including a 30-amp outlet, a 50-amp outlet, and sometimes a standard 20-amp household outlet. Your RV will only use the outlet that matches your electrical system.
If you’re not familiar with how RV electrical systems work, including the difference between 30-amp and 50-amp power, you can read our complete guide to how RV electrical systems work for a deeper explanation.
Many experienced RV owners also use a surge protector or electrical management system between the pedestal and the RV power cord. These devices help protect your RV from common campground electrical problems such as low voltage, miswired pedestals, or power surges that could damage sensitive electronics inside the RV.
Before connecting your power cord, make sure the breaker switch on the pedestal is turned off. This prevents arcing when plugging in the cord and protects both the pedestal and your RV’s electrical system.
Once the breaker is off, plug your RV power cord into the correct outlet on the pedestal. If you are using a surge protector or EMS device, connect it to the pedestal first and then plug your RV power cord into the device.
After everything is securely connected, switch the breaker on at the pedestal to send power to the RV. Inside your RV, you should now see that the electrical system is active and ready to use.
With power connected, the next step is connecting your freshwater supply so the RV has running water during your stay.
Campground electrical systems follow standard RV power connections used throughout North America.

Connect the Fresh Water Supply
With the electrical connection established, the next step is connecting your RV to the campground’s fresh water supply. This allows you to use the sinks, shower, and toilet just like you would at home.
Most campsites provide a threaded water spigot located near the electrical pedestal. This spigot supplies pressurized city water that feeds directly into your RV’s plumbing system.
Before connecting your hose, it’s important to install a water pressure regulator. Campground water pressure can vary widely, and in some parks the pressure can be high enough to damage RV plumbing, fittings, or appliances. A regulator protects the RV’s water system by keeping the pressure at a safe level.
Many RV owners also install an inline water filter between the spigot and the RV. Campground water is generally safe to use, but filters help remove sediment, chlorine taste, and other contaminants that can affect water quality.
Once the regulator and filter are attached to the spigot, connect your freshwater hose and run the other end to the city water inlet on the side of your RV. Tighten the connections by hand until they are snug, but avoid over-tightening the fittings.
After the hose is connected, slowly turn on the campground water spigot. Take a moment to check the hose connections and the RV water inlet to make sure there are no leaks. If everything looks good, your RV now has a steady supply of pressurized water.
If you want a deeper understanding of how water moves through an RV, including the fresh tank, water pump, and plumbing system, you can read our complete guide to how RV water systems work, which explains the entire system in more detail.
With the water connected and working properly, the final utility hookup at most campsites is the sewer connection.
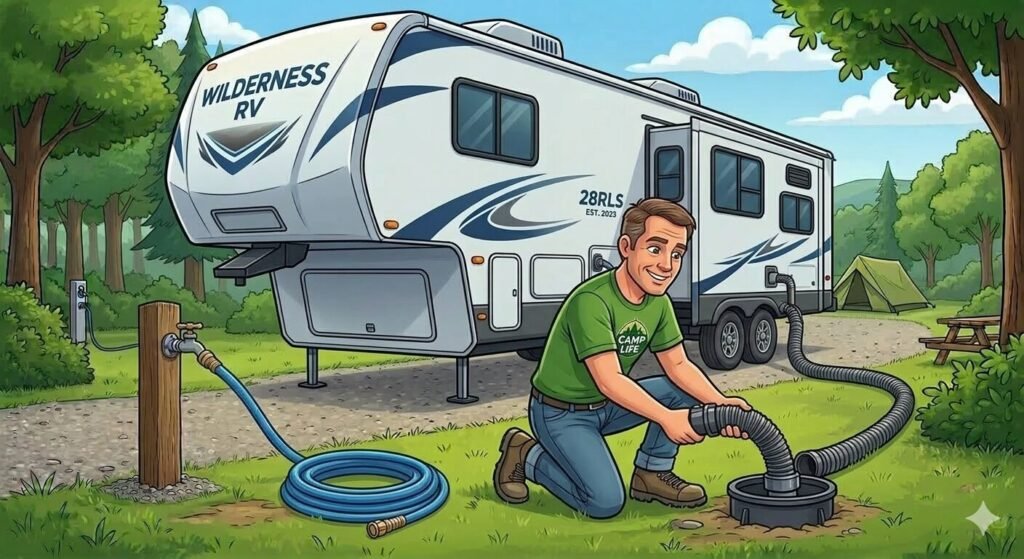
Connect the RV Sewer Hose
With power and fresh water connected, the final utility hookup at most campsites is the sewer connection. This allows wastewater from your RV’s gray and black holding tanks to drain into the campground sewer system when needed.
At most campsites, the sewer inlet is located near the electrical pedestal and water spigot. The inlet is usually a capped pipe sticking up slightly from the ground or positioned just above the gravel beside the concrete campsite pad.
Before connecting your sewer hose, remove the protective cap from the campground sewer inlet. Many RV owners place the cap somewhere visible so it doesn’t get forgotten when it’s time to leave.
Next, connect one end of your RV sewer hose to the waste outlet on your RV and secure it in place. The other end of the hose should be inserted into the campground sewer inlet. Most sewer hose fittings include a threaded adapter or rubber fitting designed to create a secure seal inside the sewer pipe.
Many experienced RV owners also use a sewer hose support to keep the hose slightly elevated and sloped downward toward the sewer inlet. This helps wastewater flow smoothly through the hose when the tanks are emptied.
Even though the sewer hose is now connected, most RV owners do not leave their tank valves open during normal camping. Keeping the black tank valve closed allows waste to collect in the tank so it can flush out properly when it is emptied. Leaving the valve open can cause solids to remain in the tank, which can eventually create clogs.
If you want to understand exactly how the tanks, valves, and sewer connections work together, you can read our complete guide to how RV sewer systems work, which explains the entire system in detail.
With the sewer hose connected, your RV is now fully hooked up to the campground utilities. The final step is doing a quick setup check to make sure everything is working correctly before you relax and enjoy your campsite.
Final Campsite Setup Check
With your electrical power, fresh water, and sewer hose connected, your RV is now fully hooked up to the campground utilities. Before settling in for the evening, it’s a good idea to take a few minutes to walk around the campsite and make sure everything is working correctly.
Check that the power cord is firmly connected and that the pedestal breaker is on. Make sure the water hose connections are tight and that there are no leaks at the spigot or the RV inlet. If the sewer hose is connected, confirm that the hose is securely seated in the campground sewer inlet and that the tank valves on the RV remain closed until you are ready to dump the tanks.
You may also want to finish extending your slide-outs, set up outdoor chairs, or adjust leveling blocks if the campsite needs a small correction after the RV settles.
It’s also worth mentioning that in this RV campsite hookup guide we go in a certain order but campsite hookups can be connected in slightly different orders depending on personal preference. Some RV owners prefer to connect water first, while others plug in power before doing anything else. The order explained in this guide is simply a routine many experienced RV owners use because it tends to make the setup process smooth and predictable.
After you’ve completed a few campground setups, the entire process becomes second nature and only takes a few minutes.
If you’re new to RV camping, it also helps to understand the basic gear most RV owners carry to make campsite setup easier. Many beginners forget a few small items that make a big difference during the first few trips.
You can see the full checklist here:
Once everything is connected and checked, your RV is ready and your campsite is set up so you can relax and enjoy your stay.